Hello all! I have some good news to share, and wanted to make a brief post here to try and lay out how this news affects my website. I have spent a lot of time in the past few months, since graduation, looking for jobs in the game industry. Luckily for me, I heard back from an application for a game designer role on the open worlds team at Rockstar San Diego.
This position was something I obsessed over for months on end. Of all the jobs I applied for, this one was by far the one I felt least qualified for … which of course only added to how much I wanted it. Beyond the “want what you can’t have” factor, Rockstar was the job I wanted because, in my genuine opinion, they make the best quality games being released currently. I was also excited because the role was a technical role, and would allow me to make use of my programming skills, something that was really important to me in this job search.
Sorry for all the build up, but I ended up getting this job at Rockstar San Diego. I couldn’t be happier, and I don’t think I could have gotten a better job. I can’t wait to create and learn alongside designers who are responsible for some of the greatest games of all time. I start tomorrow! However, this does have a monumental impact on the future of aidantakami.com.
I’ve used this site as a portfolio since 2015. All of that old content is gone now. The site didn’t even begin as game oriented, but instead strictly just me sharing my coding projects. I’ve loved having this site, and it’s obviously not going anywhere, but the content is likely going to be pretty few & far between for some time. Additionally, the nature of the content will have to change going forward. I’m not going to be able to share what I am actively working on in these posts any longer, which makes me think that the content will instead be more design theory based, and probably less coding based… for the most part. The goal of this site serving as a portfolio has been completed. You did well, site. I really do hope to have some cool stuff to share along the way, but now it’s time for this site to take on a new life.
It’s hard to say with certainty what the next year looks like for my website, but I am going to try branching out with my content. It will continue to be centered around game development, but will be different from the other posts on this site. Less “show you how I did this” and more “talk about why I did this”. I hope that this new form of content can be helpful to people wishing to become involved in game dev, and that this site can eventually become filled with helpful content.
Thanks for reading this. Sometimes, when I write on this site it feels like I’m speaking into the void. A lot of times, I write on here and I’m sure that nobody will ever read what I wrote. That doesn’t bother me. But as I’m sitting here and determining the fate of this void that I’ve been yelling into for 6 years, I’m realizing how much this website means to me. I am so proud of the content on this website that even if nobody ever saw it, I would still love it. I love game development. I love writing code. This site has given me a reason and means to share what I love, and I’m so grateful for that. Thank you, website. You’re not going anywhere, but I hope to do you justice with the future of your content.
Hello all! I just wanted to make a quick post to give my site an update on what I’ve been up to! This past week, I finished my degree & graduated from USC with a BA in Interactive Entertainment. After being an undergrad student for 6 years, I am more than ready to enter the industry and begin to work & learn in a professional environment. I am very grateful for the experiences I gained from working on games at USC, and today I’m proud to show off the game that I worked on over the past year as a part of USC Games.
The Trials of Snowshoe Thompson is a game I worked on as the Lead Engineer, alongside a team of 5 other engineers. You can see posts here about the development process of Snowshoe, but in short: our goal as engineers on this project was to recreate the feeling & physics of realistic cross country skiing. I am very proud of how this project turned out, and greatly value the lessons I learned in the process. I most enjoyed being able to work on large scale Unity architecture, and working alongside very brilliant engineers.
I may eventually come back and write a more reflective post on this project, but for now I am going to leave just the link to the download, and hope you are able to enjoy it! You will need a playstation or xbox controller to play the game!
Hello all, I wanted to post today to share an exercise I worked on over the past week where I designed a Call of Duty: Cold War game mode.
My goals with this design were fairly simple: A multiplayer game mode that I could realistically see implemented into CoD CW based on 3 major factors:
it’s use of the game’s already present mechanical affordances, therefore simplicity of implementation
it’s uniqueness amongst already established game modes
the ways in which it encourages the purchase of premium content, and opens opportunities for further customization
Night Ops
A Call of Duty: Cold War Multiplayer Game Mode
by Aidan Takami
The Basics
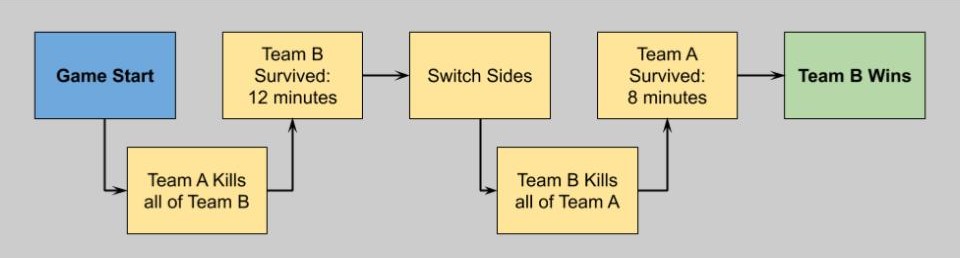
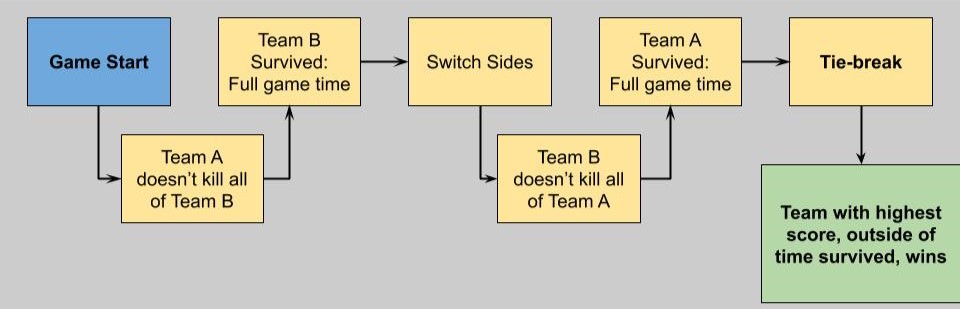
In each round, for a total of 2 rounds, teams take on the role of either Assassin or Survivor. The game is won by the team who survives the longest amount of time while playing as the Survivors. The Assassin team works together to hunt down the Survivors. The game is played on an extremely dark map. The Assassin team are afforded a better sense of surrounding/ability to traverse in the dark (night-vision goggles, strong flashlight, etc), whereas the Survivors are mostly unaided in their ability to navigate the darkness. Teams consist of 20 players.
Assassin Team
Survivor Team
Night Ops Game Specifics
Rounds capped at 15 minutes
Tiebreaker comes down to total scoring of teams based upon stats:
Players Assassinated
Assassins Killed
Assists
Map Setup
Open spaces are few and far between, and small in size
Most of map consists of small, easily missed, “hiding spaces” that fit no more than 2 players
Experience Goals
Assassin team: Elite, powerful, fearless but tactical.
Survivor team: Uneasy, hunted, hyperaware.
Further Design Goals
Give more use to the new Melee weapons being added into Black Ops Cold War (my personal favorite mechanic) such as Sledgehammer or Wakizashi.
Lowering the lighting of the scene & the amount of visibility afforded to the Player in a multiplayer FPS is unique (to my knowledge)
Use of night vision fits the time period of Cold War, & could later be used as an additional layer of customization.
Example Game Scenarios
Scenario 1
Scenario 2
Scenario 3
Required Assets
Engineering
A game mode built for the win condition of most time survived, which allows Assassins to respawn and doesn’t allow Survivors, and also allows Assassins only melee weapons
Art
“Night-vision” full screen camera effect/shader (or equivalent light source asset) for Assassins
Lesser strength light source asset for Survivors
Assets for unique map
Audio
Audio specific to the tactical/quiet nature of Night Ops
Ambience audio
Audio associated with “night-vision” effect
More concealed versions of existing audio (to give effect of perceived stealth)
Design
A map designed to be played with minimal to no lighting, with spawns together for Assassins & separate for Survivors
A comprehensive & specified scoring system to serve as tiebreaker
Tunable Values
Team size
Number of rounds & round length
Strength of light given to bothe Assassins and Survivors
Respawn delay of Assassins
Possible Issues
Playing with darkness can be tricky to get right. The amount of vision given to the players is a core feature of the Night Ops game mode, but if this isn’t done right it would be extremely frustrating to players. Darkness also may compromise the integrity of playing Night Ops competitively. A solution: by finding the right way to afford both teams vision, independently, the game darkness could become equally disadvantageous to all players on the same team.
Melee weapons are really fun, but Assassins may find it difficult to surprise Survivors/get the upper hand since Survivors have access to all their normal weapons. A solution: Increasing the speed of the Assassin team, or at least including it as a tunable value separate from the speed of the Survivor team, would perhaps lessen the difficulty and aid in the Assassins experience goal.
With minimal repercussions for dying, the Assassin team may abandon any attempts to be subtle/hidden. A solution: add a win state where the Assassin team runs out of a pool of lives, similar to Control, and must then forfeit the game.
Hello all, this is a walkthrough of my solution for detecting the device that the player is using in a single player “gamepad” based game. In my specific case, I’m using this information to have my UI constantly represent the correct “controls” UI for the type of device my player is using. At the time of writing this, my system is specifically built to sort between PlayStation & Xbox controllers, with Xbox being the default. With that said, this system is easily extendable, and I hope that will be clear through my code & explanations. This guide is meant to help those who have routed all of their input beneath the “game pad” umbrella in the Unity Input System, but still want the specific type of controller used by the player to be accessible.
This post is using the “New” Unity Input System, NOT the Unity Legacy Input
I ran into a lot of very interesting road blocks in my quest to create an abstracted UI Image system which would live react to the type of controller being used by the player…. It sounds funny, because you would think it would be simple to detect the type of controller being used by the player, but the way that the Unity Input System deals with game pad style controllers seems to do a pretty good job of burying this data.
There were 2 ways which I thought I could approach this. The first would be to go into my actual Input Map and specify control schemes by controller type, and then have a manager which detects input from any/all control schemes. and switches state based upon the most recent input. I chose not to do this because, in my opinion, one of the biggest appeals of the Unity Input System is that it supports the most common controller types all beneath the gamepad umbrella.
It’s important to note that in my project, I have my PlayerInput Behavior set to Invoke C# Events.
My first step in this system was listening in to the InputSystem.onDeviceChange, which must be assigned to a function which takes an InputDevice and InputDeviceChange. This event will fire off every time a change to device is detected. These include a controller being: added, disconnected, removed, & reconnected. InputDeviceChange represents which one of these events was detected. Here’s what those look like:
Note: _currentController is just a basic enum meant to internally store the controller state
    private void GameManagerRegisterInput()
    {
        //Binds onDeviceChange event to InputDeviceChanged
        InputSystem.onDeviceChange += InputDeviceChanged;

    }

    //Method called  when a device change event is fired
    private void InputDeviceChanged(InputDevice device, InputDeviceChange change)
    {
        switch (change)
        {
            //New device added
            case InputDeviceChange.Added:
                Debug.Log("New device added");


                break;

            //Device disconnected
            case InputDeviceChange.Disconnected:
                controllerDisconnected.Invoke();
                Debug.Log("Device disconnected");
                break;

            //Familiar device connected
            case InputDeviceChange.Reconnected:
                controllerReconnected.Invoke();
                Debug.Log("Device reconnected");


                break;

            //Else
            default:
                break;
        }
    }//Method called  when a device change event is fired
    public void InputDeviceChanged(InputDevice device, InputDeviceChange change)
    {
        switch (change)
        {
            //New device added
            case InputDeviceChange.Added:
                Debug.Log("New device added");

                //Checks if is Playstation Controller
                if (device.description.manufacturer == "Sony Interactive Entertainment" && _currentController != CurrentControllerType.PlayStation)
                {
                    //Sets UI scheme
                    Debug.Log("Playstation Controller Detected");
                    currentImageScheme.SetImagesToPlaystation();
                    _currentController = CurrentControllerType.PlayStation;
                    controllerTypeChange.Invoke();
                }
                //Else, assumes Xbox controller
                //device.description.manufacturer for Xbox returns empty string
                else if(device.description.manufacturer != "Sony Interactive Entertainment" && _currentController != CurrentControllerType.Xbox)
                {
                    Debug.Log("Xbox Controller Detected");
                    currentImageScheme.SetImagesToXbox();
                    _currentController = CurrentControllerType.Xbox;
                    controllerTypeChange.Invoke();
                }
                break;

            //Device disconnected
            case InputDeviceChange.Disconnected:
                controllerDisconnected.Invoke();
                _currentController = CurrentControllerType.Other;
                Debug.Log("Device disconnected");
                break;

            //Familiar device connected
            case InputDeviceChange.Reconnected:
                controllerReconnected.Invoke();
                Debug.Log("Device reconnected");

                //Checks if is Playstation Controller
                if (device.description.manufacturer == "Sony Interactive Entertainment" && _currentController != CurrentControllerType.PlayStation)
                {
                    //Sets UI scheme
                    Debug.Log("Playstation Controller Detected");
                    currentImageScheme.SetImagesToPlaystation();
                    _currentController = CurrentControllerType.PlayStation;
                    controllerTypeChange.Invoke();
                }
                //Else, assumes Xbox controller
                //device.description.manufacturer for Xbox returns empty string
                else if(device.description.manufacturer != "Sony Interactive Entertainment" && _currentController != CurrentControllerType.Xbox)
                {
                    Debug.Log("Xbox Controller Detected");
                    currentImageScheme.SetImagesToXbox();
                    _currentController = CurrentControllerType.Xbox;
                    controllerTypeChange.Invoke();
                }
                break;

            //Else
            default:
                break;
        }
    }    private void GameManagerRegisterInput()
    {
        //Binds onDeviceChange event to InputDeviceChanged
        InputSystem.onDeviceChange += InputDeviceChanged;

    }

    //Method called  when a device change event is fired
    private void InputDeviceChanged(InputDevice device, InputDeviceChange change)
    {
        switch (change)
        {
            //New device added
            case InputDeviceChange.Added:
                Debug.Log("New device added");


                break;

            //Device disconnected
            case InputDeviceChange.Disconnected:
                controllerDisconnected.Invoke();
                Debug.Log("Device disconnected");
                break;

            //Familiar device connected
            case InputDeviceChange.Reconnected:
                controllerReconnected.Invoke();
                Debug.Log("Device reconnected");


                break;

            //Else
            default:
                break;
        }
    }
While this was the first step I took, I was working backwards a bit. With this event being listened to, we can react to new controllers being connected, to controllers losing connection, and a bunch of other events. These events usually represent a reason to re-evaluate the current images being displayed for controls.
I wrote a fairly simple Scriptable Object which holds all the textures we will be using in our “controls” UI. So this scriptable objects holds all the images used to represent xbox and playstation controls. Additionally, it has a set of private textures which hold the “current” image for that button. Through this abstraction, I can have the Scriptable Object flip it’s set of “current” images, and have all UI read from this ScriptableObject for the image it needs to display.
Now that I had the foundation, and a way to store/represent the “controller type” state, now I just needed to determine what type of controller was being connected/added, and pass that state on to my Scriptable Object. Using the API for the type Device, which is passed on this event as a direct reference to the Device that instigated the event, I was able to determine that the field description has sub fields which are used to define the specific type of controller, the manufacturer, and more. The field product is a string which would come out something like “Dual Shock 4” or “Xbox One Elite”. While this is certainly useful, I wanted things to remain as generic as they could be. The manufacturer proved to be the most abstracted I could get, while still distinguishing between the specific types of gamepads. However, herein lies the first issue I encountered. While the device.description.manufacturer field on a Playstation controller returns a nice & neat “Sony Interactive Entertainment”, that same field for the Xbox controller is entirely empty. Since I only have to support the 2 types, I wrote these conditions into an if/else, and called it a day. But as I extend the system to include more controller types, I would make use of the device.description.product and distinguish between the remaining types of controllers. Here’s what that same chunk from above looks like with these cases written in.
A note: currentImageScheme is my Scriptable Object described above. This scriptable object provides the texture to raw image prefabs in my UI. controllerTypeChange is an event which is listened to by the UI. The UI will react to this event by setting their texture to the “current” texture stored in the ScriptableObject
//Method called  when a device change event is fired
    public void InputDeviceChanged(InputDevice device, InputDeviceChange change)
    {
        switch (change)
        {
            //New device added
            case InputDeviceChange.Added:
                Debug.Log("New device added");

                //Checks if is Playstation Controller
                if (device.description.manufacturer == "Sony Interactive Entertainment")
                {
                    //Sets UI scheme
                    Debug.Log("Playstation Controller Detected");
                    currentImageScheme.SetImagesToPlaystation();
                    controllerTypeChange.Invoke();
                }
                //Else, assumes Xbox controller
                //device.description.manufacturer for Xbox returns empty string
                else
                {
                    Debug.Log("Xbox Controller Detected");
                    currentImageScheme.SetImagesToXbox();
                    controllerTypeChange.Invoke();
                }
                break;

            //Device disconnected
            case InputDeviceChange.Disconnected:
                controllerDisconnected.Invoke();
                Debug.Log("Device disconnected");
                break;

            //Familiar device connected
            case InputDeviceChange.Reconnected:
                controllerReconnected.Invoke();
                Debug.Log("Device reconnected");

                //Checks if is Playstation Controller
                if (device.description.manufacturer == "Sony Interactive Entertainment")
                {
                    //Sets UI scheme
                    Debug.Log("Playstation Controller Detected");
                    currentImageScheme.SetImagesToPlaystation();
                    controllerTypeChange.Invoke();
                }
                //Else, assumes Xbox controller
                //device.description.manufacturer for Xbox returns empty string
                else
                {
                    Debug.Log("Xbox Controller Detected");
                    currentImageScheme.SetImagesToXbox();
                    controllerTypeChange.Invoke();
                }
                break;

            //Else
            default:
                break;
        }
    }
So remember when I said I was working backwards? At this point, my system detects and reacts to big controller events, but at the start of the program has no idea what controller is being used. This is where I encountered the majority of my hardship, but I’m very proud of the end result!
Something I learned quickly is that the Unity Input System stores all known input devices, regardless of them being currently connected or not. So if my player is playing on their xbox controller, it’s batteries die, and they switch to their PS controller, InputSystem.devices still stores both devices. Additionally, while the type Device has a property enabled, this returns true for all devices registered to the Unity Input System. So all of this results in perhaps the most notable roadblock I encountered with this System: I could not find a way in which the Unity Input System distinguishes between the currently connected/in use controllers and those which are simply known by the Unity Input System, ie not in use at all. Devices can easily be individually assigned, and switched between, and detected, but there is no property of the Type Device (that I could find) which represents whether an individual device is actively connected. I pray I’m wrong about that, but the closest I could get was InputDevice.lastUpdateTime, which InputSystem inherits from. Even that field returns extremely unreliable values, as on PS it counts gyroscopic data as input, every frame, and in my tests, was returning the same value for all my devices, connected or not.
TlDr; I could not find a way to distinguish between connected and non connected input devices.
My response to this, however, is where I’m most proud of this code! I found that if I remove all the stored devices on game start, the controller being used by the player instantly re-constructs itself, and is quickly the only device stored in InputSystem.devices[]. From here, it’s easy to just check InputSystem.devices[0].manufacturer, and we have the same check on game start as we do when a controller event happens. Here’s that code!
Once again, currentImageScheme is my SO
//Called in GameManagerGameStart() to set the UI initially
    private void UIImageSchemeInitialSet()
    {
        //Disables all devices currently read by InputSystem
        for (int rep = 0; rep < InputSystem.devices.Count - 1; rep++)
        {
            InputSystem.RemoveDevice(InputSystem.devices[rep]);
        }

        if (InputSystem.devices[0] == null) return;

        //Checks the first slot of the InputSystem devices list for controller type
        if (InputSystem.devices[0].description.manufacturer == "Sony Interactive Entertainment")
        {
            //Sets UI scheme to PS
            Debug.Log("Playstation Controller Detected");
            currentImageScheme.SetImagesToPlaystation();
            _currentController = CurrentControllerType.PlayStation;
            controllerTypeChange.Invoke();
        }
        else
        {
            //Sets UI scheme to XB
            Debug.Log("Xbox Controller Detected");
            currentImageScheme.SetImagesToXbox();
            _currentController = CurrentControllerType.Xbox;
            controllerTypeChange.Invoke();
        }
    }
From there, to complete my system, all I had to write was a MonoBehaviour which stores a reference to my SO, and listens to my controllerTypeChange event, reacting by just setting its image to the corresponding image stored in the Scriptable Object. Here’s that code, for those who are curious!
public class ControllerImageScript : MonoBehaviour
{
    public UIImageSchemeSO uiImageScheme;

    public enum buttonImage
    {
        southButton,
        eastButton,
        northButton,
        westButton,
        rightTrigger,
        leftTrigger
    }

    public buttonImage myButtonImage;

    private RawImage myImage;

    // Start is called before the first frame update
    void Start()
    {
        myImage = gameObject.GetComponent<RawImage>();
        SetButtonImage();
    }

    public void SetButtonImage()
    {
        if (myButtonImage == buttonImage.southButton)
        {
            myImage.texture = uiImageScheme.GetSouthButton();
        }
        else if (myButtonImage == buttonImage.eastButton)
        {
            myImage.texture = uiImageScheme.GetEastButton();
        }
        else if (myButtonImage == buttonImage.northButton)
        {
            myImage.texture = uiImageScheme.GetNorthButton();
        }
        else if (myButtonImage == buttonImage.westButton)
        {
            myImage.texture = uiImageScheme.GetWestButton();
        }
        else if (myButtonImage == buttonImage.leftTrigger)
        {
            myImage.texture = uiImageScheme.GetLeftTrigger();
        }
        else if (myButtonImage == buttonImage.rightTrigger)
        {
            myImage.texture = uiImageScheme.GetRightTrigger();
        }
    }
}
I spent all day on this code, and I found it a surprisingly underdocumented topic. I hope that this proves helpful to those who are in my situation, just as all the wonderful discussions/threads online helped me!
Hello all! Happy winter! I wanted to write a post today to document and detail what I have been working on over my winter break from school! As I had briefly mentioned in my October Update, I am currently working on a Vertical Slice of a horror game, which is now confidently titled The Wicker. I have been working on this side project with 1 other developer since October, and we are approaching the final sprint of our development. I have worked as the only Engineer and have worked together with my partner (Alan Karbachinsky) on the design of this game. Additionally, we have been working with a composer, Zoe Morfas, to provide music and SFX for our highly sound centric design.
The Wicker is played on the Mouse and Keyboard, and experiments with using abstract environmental feedback as a means of communicating game state to the player. The experience goal of this game is to make the player feel as though they are attempting to solve a puzzle with a blindfold. A dark and constantly unsettled abstract arena is accompanied by another entity’s looming presence, causing discomfort and fear. Additionally, we hope to instill uneasiness in players through interpretation & understanding of environmental factors. Below, I would like to breakdown some of the nuances and highlights (in my personal opinion) of the design of my WIP game, The Wicker.
Overview
As always… please excuse gif quality!
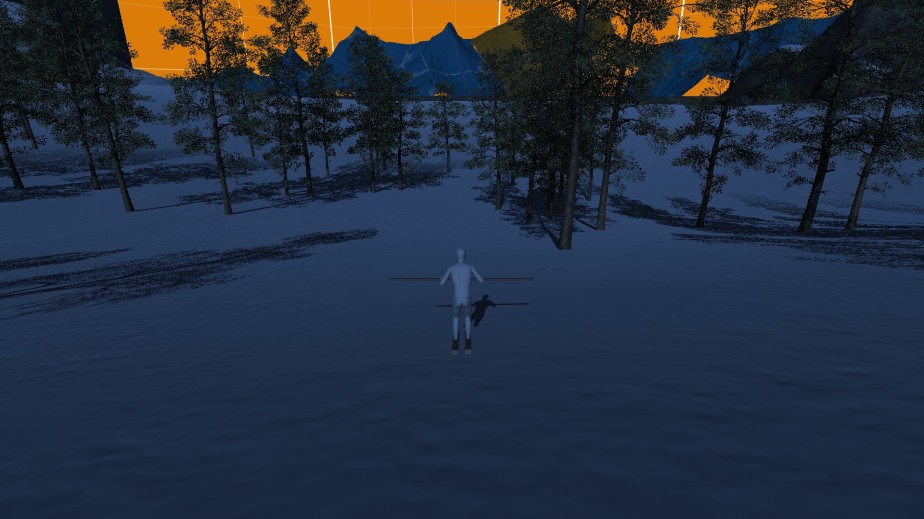
Players are spawned into a 3 dimensional environment, surrounded by suspended and spinning cubes (shown above). Players can walk through these suspended cubes, which disappear upon contact, but the player is slown down by this. The environment is dark, and players hear a constant ambiance “drone” (which is being played through a low pass). Players use general WASD movement and First Person mouse input to move and turn. Holding shift allows players to sprint, endlessly, but they are slowed to the same speed upon walking into a cube. Using the mechanics here and below, players are tasked with finding the seer eye, and delivering it to the socket. Both of these objectives are hidden in the game arena, which takes a sprinting player about 45 seconds to traverse along the x axis, and 25 along the y axis.
The Game Loop:
The “30 Second Test” Loop:
Mechanics
Create Tunnel – Left Click: Casts forth a conjured wall from the player, in the facing direction. This wall removes all suspended cubes it comes into majority contact with. This is used by players to create pathways down which they can move, unhindered by the slowing effect of the cubes. This wall moves much quicker than the player. This ability is on a 5 second cooldown.
Cast Light – Right Click: Casts forth a light orb from the player, in the facing direction. This light orb provides some light as it moves through the air, but upon contact with a cube it will turn that cube into a light cube, greatly illuminating the surrounding area. This light orb moves only slightly quicker than the player’s sprint speed, and will expire after 7 seconds uncontacted. This ability is on a 7 second cooldown.
Note the HUD in bottom righthand corner
Connect with Objective – Mouse Input: To understand where the current objective is located, players must use their mouse to look in a full circle, and proceed in the direction indicated by both an audio stimulus (low pass filter removed from the ambiance drone) and a UI indicator (a music note in the bottom right hand corner). This mechanic is a simple collider on the objective and raycast from the player forward, but I have attempted to utilize the affordances of this schematic to our advantage. The Objective (which has the collider on it) is programmed to manipulate the size of the collider, as well as just outright disable it for brief moments. This dynamicity adds a nice touch of uneasiness in one of our core mechanics. An example of this in action would be if a player is pursuing the direction in which they receive the auditory & visual cures, this is because their raycast is hitting the objective collider. but as they pursue that direction, their raycast may lose contact with the collider, causing their cues to cut out, and forcing them to realign to the movement of the objective collider. This mechanic is something I worked a lot on in the beginning of production, and I feel has turned out very fun. I was BEYOND excited to see an extremely similar (pretty much identical(and much more polished)) mechanic present in Spider Man: Miles Morales, released a few weeks ago (The Sound Sample minigame located throughout the map).
The Spirit
Players are being pursued. The spirit AI is trying to stop the player from bringing the eye to the socket, and although the AI itself is a simple navigation mesh agent, I have tried to create complexity through the affordances of such a style of pursuit. For those unfamiliar, nav-mesh agents are given a destination, and will pursue at a set speed, along specified meshes. In The Wicker, this destination is set every frame to be the player’s current location. However, since the player spends a majority of their time moving, this often leads to the AI approaching the player from behind. This was something we didn’t want, as we thought the player should always be able to witness the spirit…. atleast a little. Instead, I began to view the nav-mesh agent component of the enemy as more of a dynamic timer: in a constant pursuit of the player, at a manipulated speed, but with the mesh renderer disabled entirely, and just counting down until it will trigger an actual enemy encounter. This count down is dynamic because it is affected by the player’s movement. In more plain terms: The nav-mesh agent has no visual representation while it is in pursuit of the player. The enemy is simply an invisible collider in pursuit of the player… however, once this AI reaches the player, this begins what we have dubbed the encounter sequence, which is where the player will actually run the risk of being dragged to their death by the spirit.
Encounter Sequences
Once the invisible nav mesh agent has reached the player’s position, 1 of 2 things can happen.
The first thing: The AI is teleported to 1 of 5 positions in front of the player, and an encounter begins. The encounter is indicated by an audio cue (screams), an environmental cue (change of color of light cubes and directional light), a “juice” cue (camera shake), and then of course the appearance of the enemy. The enemy’s mesh renderer becomes enabled during an encounter sequence, and the enemy is now pursuing the player head on. The teleport locations are relative to the player’s position & rotation, and are at such a distance from the player that the enemy spawning is un-rendered by the player camera. Additionally, there is a slight (purposeful) delay between the enemy appearing and the cues listed above^. This is done to help time-up the player & AI’s encounter with the mood shift of the level, while still indicating to the player that they are in immediate danger. This style of encounter ends when either the player creates enough distance between themselves and the AI, or the AI catches the player. This sequence can also be escaped by placing the eye in the socket, and thus winning the game.
The second thing that can happen is the AI “fakes out” the player. In an effort to create the mood of uneasiness, I added this style of encounter which has the same probability as all other encounters (specifically the AI is either teleported to 1 of the 5 positions above, or sent into this “fake out” sequence). In the fake out sequence, the enemy is first made visible far out in front of of the player. This is where the “encounter” cues are enabled, all the same as the above encounter type, but with the use of a specific audio. The AI’s position is then lerped from there to directly in front of the player. Right before it runs through the player, the enemy vanishes, a low pass filter is applied to the specified audio, and the bot is teleported to it’s spawn location. Then the encounter sequence ends (the AI becomes invisible and all encounter indicators are disabled).
Here I’d like to share the progression of the “fake out” in a few gifs.. Please ignore T-pose, still in development! Top: Experimenting with working a “fake” encounter into my existing system. Middle: Added position lerp and environmental reaction. Bottom: Added a new shader meant to conceal the unrealistic movement of a direct position lerp.
Movement
To avoid the simplicity of the generic nav mesh agent pursuit, I created a unique movement scheme meant to give the agent a more frightful approach (in one of the normal encounters). So, just to clarify, while the enemy AI is invisible (and essentially a dynamic timer), this movement scheme is NOT being used. This movement solution is only for when an actual encounter (non fake out) begins. The first thing I did was give the AI 6 children locations (which move relative to the AI’s position) that it could choose to move to. All are in front of the AI (aka the direction it is heading), with 3 to the AI’s left and then 3 mirrored on it’s right. Then, I placed the AI’s movement in a thread where, upon reaching a set time interval, it will teleport itself to one of the nearby child locations, randomly. This worked well, and was very promising with how unsettling the movement felt, but it was still rusty and missing something.
To try and mask the obvious teleporting of position, created a second thread within the initial one mentioned above. This thread will be called once per movement interval, and essentially applies 1 of the 3 shaders we have for our enemy, randomly. Our enemy shader is brilliant, and the only thing in this game we have not produced ourselves. All credit to Inan Evin on the Unity Asset Store. This “glitch” shader proved to be very customizable, and we were easily able to transform them into proper “horror” material. Adding these shaders into the movement quickly made the movement more fear inciting, as well as masked up the “transitions” in the movement scheme I had built. Here’s a gif of it all put together!
Abstract Environmental Feedback in The Wicker
One of the core features of The Wicker that I have not yet touched on is the significance of the spinning cubes. This is one of the many things in our environment which we are trying to use to communicate the game state to the player. With The Wicker, we set out to toe the line of how little information we would directly be giving to the player for them to understand our complex game. This has proven an immense task in design, but one of the ways we chose to address this was using the environment to communicate with the player. The ways in which we have chosen to do this are all in pursuit of an visual aesthetic goal of minimalism, and other worldly-ness, and “play feel” aesthetic of curiosity & fulfillment, relying heavily on pattern recognition, and all with a tone of horror, of course!
The spinning cubes, and more specifically the speed at which the cubes rotate represents how close the enemy AI is to the player IN ALL STATES. So even while the AI is invisible, and a dynamic timer, the cubes are still spinning relative to how close the AI is to the player’s position (with SODA I’m sure you see how this is so easy). Managing literally thousands of cubes is no small task, and I opted out of using ECS. So all of the managing of my cubes comes down to rigorous abstraction from cube, to individual “storm unit” (around 90 cubes), and then to a storm manager. The storm manager controls which cubes are rendered (once again relative to players location(SODA, DUDE!)). The storm manager also dishes out the tick to each individual storm unit, which then rotates each cube accordingly. The spinning of the cubes set out to do 2 things: Tell the player about their position relative to AI and incite an uneasiness/faster pace while the AI is near.
The lights in The Wicker are another facet through which we try to communicate the game state to the player. As can be seen in many of the gifs above, the default lighting color of all lights in the game is either a bright purple(player spawn light), or a purplish-pink(lights cast by player). However, upon an enemy encounter, all lights in the scene are changed to a deep red for the duration of the encounter. This, in turn, not only signals to the player the beginning of an encounter, but the end to one as well. This feature of the lights is what adds the most value to the “Cast Light” mechanic. Ideally, players are using their lights throughout the duration of the game, and by placing them throughout the arena they are able to better understand the state of their encounter. In addition to turning the light cubes color, other environmental lights are also signaled on the event of an encounter, and switch to the same deep red. This includes the spawn light and the directional light.
The ambiance is another extremely important indicator to the player. While the player is faced away from the current objective, the ambiance audio (a mild drone and occasional chirps) is played under a low pass audio filter. However, when the player is facing the current objective, the frequency cutoff of the low pass is disabled, creating a noticeable jump in audio, which is also synced up with a UI indication on the player’s screen. In our playtesting, we found that allowing players both the visual and audio cue made it easier to understand that there may be an interest in continuing that direction. Our use of the ambiance in this way has become one of the integral features to one of our core mechanics, “connect with objective”.
Tutorialization of Our Unconventional Game
Left Image: the Hub a few months ago. Right Image: the Hub a few minutes ago. Note: time is relative.
Up to this point, all I have discussed is what me and my peer consider to be the actual game, however it is not the only part of our experience. In fact, it’s not the front facing part of the experience at all. Players spawn into The Wicker in the “Hub”. This hub is where we have placed all the tutorialization of our game. The Wicker has not been an easy game to teach people… as I’m sure you understand at this point in the post! There is a lot of intended “learn on your own” moments. With that said, we have worked hard to tutorialize in a way that would remain true to our aesthetic goals, and came onto 5 main solutions. Within the hub, players are not pursued, and they interact with the environment to become familiar with their surroundings, before being led to a teleport into the “actual” game.
Interactable environmental “signs” in the hub, which host pop-up text, are an extremely effective way of communicating a LOT of information while remaining within an extremely realistic scope. Through a simple event based prefab, multiple of these were placed around the hub. To stay to the intended aesthetic, the text is carefully written, and my teammate has modeled an awesome “obelisk” with etchings on the side, which are tied to the interactable text pop-up. These give our hub some visual depth, as well as a platform from which we can communicate necessary tutorial information to the player’s who seek to complete the experience.
Scrolling mechanic explanation HUDs at the bottom of the screen, which are only present while in the hub, have become a useful tool for us. We use this “scrolling text” (4 tips which alternate in 5 second intervals of being displayed at the bottom of the screen) as an opportunity to explain the core mechanics of our game, as well as delineate the Hub area from the main game. When players enter the “actual” game, this UI disappears completely, but reappears as soon as the player is back in the hub. This is meant to create a more “tutorial” representation of the hub in the player’s mind, and separate it from the actual experience.
Theeye and socket serves 2 great purposes. Firstly, it allows players to interact with the eye & socket mechanism, which helps create familiarity when they encounter it in the “actual” game. Secondly, once the player places the eye in the hub socket, a light appears and leads them towards a bright light in the distance. Upon approaching that light, players hear a “drone” noise getting louder and louder. As the players walk into the blindingly bright light, the noise now begins to gain heavy bass (as a low pass filter is lifted). Just as the noise reaches max volume and weight, it cuts completely silent. The screen remains blinded by light, but the player has actually been teleported out of the hub, and into the main game arena for the beginning of the game.
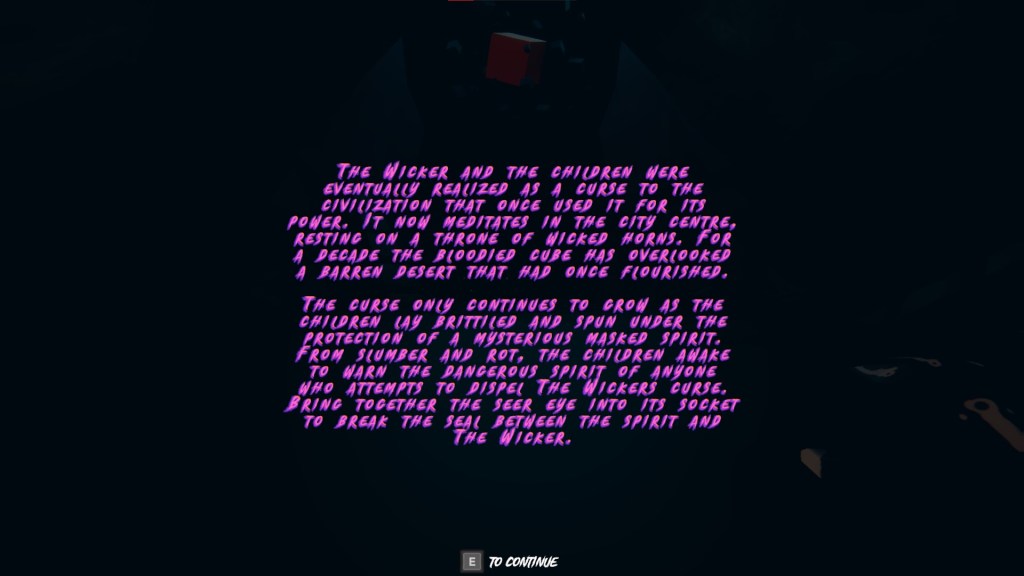
A splash screen was good enough for Start Wars, so it’s good enough for us. By splash screen I mean at the beginning of the game, when the player enters from the menu, a chunk of text pops up on their screen. The text is meant to heavily adhere to our aesthetic, but beneath the cryptic language it depicts the general goal of the game. Bring the seer eye to the socket. Additionally, having this text upon entry into the game helps to set the narrative tone of the game.
I told you it’s cryptic!
A comprehensive narrative direction is foundational to all the other solutions listed above, as it helps us adhere completely to our aesthetic goals, and create an equally unsettling and intriguing experience for the player. Additionally, writing some background on the world in which The Wicker takes place has helped give us a narrative voice through which we can use to communicate with the player, while staying true to our aesthetic goals.
Final Thoughts
The Wicker has been a real amazing game to work on. I have enjoyed both the engineering and design side of the project, and am excited to see it finally taking a form which is more true to our expectations for the project. As I mentioned above, we are entering the final sprint in this coming week, and plan to have a “release candidate” build probably sooner than that 2 week sprint ends. I will absolutely be posting the itch link here, and it will of course be free. I’d like to leave you, for now, with a gameplay video! This will hopefully be good reference for understanding all the audio mentioned above. Thanks for reading, and have a great day!
Hello all! I’m posting today with a brief follow up on my post about terrain texture detection in Unity. If you haven’t checked that out, it will definitely be informing this post! I have been working further on getting this system to work with my current PlayerMovement system, and have come to a neat solution of abstraction which can be branched to communicate anywhere in your game what the current terrain texture is beneath the player.
Here’s what this solution solves:
Our player’s movement is effected constantly by what type of ground the player is on. So for example, braking power & amount of friction (2 separate variables in the PlayerMovement). Since we need these values to be dynamic, a layer of abstraction is helpful in allowing these values to be continuously modified by factors such as the terrain.
Our designers have not finalized the variables effecting movement at large, this solution allows for testing of multiple combinations of these movement variables as extreme ease to the design team. This will be used for AB testing in our playtests down the road.
The solution:
It’s very simple, but has helped a lot with working this data into my PlayerMovement in a clean and clutter free way. All I have done is created a new Scriptable Object type, MovementVariables, and moved all of the “designer variables” into this scriptable object. Additionally, I have created a simple class, TerrainType, which stores all of the variables that are dynamic and dependent upon the terrain the player is on. I’ve made this class serializable, and within my MovementVariables I have a public array of TerrainType that allows the designers to set each terrain type uniquely for each variant of the MovementVariable type.
MovementVariables has a public function, SetToTerrain(), that takes in an int representing the terrain texture the player is currently on (remember this is stored in an int by the Alpha map). Upon taking that int, MovementVariables will set the necessary variables to match those of the corresponding TerrainType in the local array. So, for example, terrainTypes[0] is created by the designer to have float frictionLevel = 1, and float brakingPower = 3. Once SetToTerrain() takes in an int 0, then MovementVariables will set the frictionLevel and brakingPower according to whatever is in terrainTypes[0].
From here, all that is necessary for setup (besides setting the designer variables) is to create a reference to a MovementVariables in both the PlayerMovement and the TerrainTextureGetter. The former will simply read the scripted values from this Scriptable Object, and the latter will pass the int representing the texture into SetToTerrain().
… and that’s it! It’s a super simple solution but really has helped me in passing these terrain settings into my movement, in making my PlayerMovement less beefy, and in aiding the design team with finalizing their movement variables… Here’s some code
[System.Serializable]
public class TerrainType
{
   public string terrainTypeName;
   [Range(0f, 100f)]public float stridePushPower;
   [Range(0f, 15f)] public float brakingPower;
   [Range(0f, 5f)] public float slidingFrictionPower;
   [Range(0f, 10f)] public float turningSpeed;
}
This is the TerrainType class which is key in allowing this abstraction to work. These are the variables in PlayerMovement which we want to be altered by the terrain type beneath the player.
This chunk of code above is located within my MovementVariables Scriptable Object. The top variables are what are being referenced within PlayerMovement, but they are being set below. SetToTerrain() is called every time a terrain texture change is detected. An important note is the [ShowOnly] editor attribute was written and made public by Stack Overflow user Lev-Lukomskyi. Huge thanks for that, as it keeps the designers from touching things they shouldnt ;). I’m just kidding… I hope that this post was helpful for anyone who needed a follow up from my last post about terrain texture detection! Until next time!
Hello all, I hope that as you read this, all is well in your world. The last week has been a truly fitting capstone on the crazy year that has been 2020, especially for U.S. citizens. I want to take your mind off the madness for a moment and talk about something I worked on over the last few days.
As you can read about in my October Update, I’ve been making a skiing game! It’s been awesome so far, and really enjoyable. Something that is crucial to the design of our game is different textures on the terrain beneath the player having differing effects on gameplay. For example, we have a texture that represents “heavy snow”, which will bring down the speed at which the player treks through the snow, as well as an “ice” texture, which would instead speed the player up at a much higher rate, and slow down at a much slower rate. The process itself is not complicated, it just involves getting the terrainData of terrain below the player, and using the player’s relative position to the terrain to calculate what the texture is that is present at that point on of the terrain, and in what strength. While these calculations are somewhat daunting (involving the 3D float array used to represent an alpha map), they’re actually not too complex when broken down.
Where my specific need for this process differs from a lot of what I’ve seen online is that our Unity scene involves upwards of 20 separate terrain objects (and therefore over 20 individual TerrainData data type). The solution here for me was to setup a function to work in tandem with the terrain splat mapping calculations above. This function takes the player’s position, and compares it to the center point of the terrains stored in the array Terrain.activeTerrains. The terrain returned is then interpolated on to determine what textures is beneath the player. Here’s the code return the closest terrain to the player! Just remember I use Scriptable Objects to store live values (such as player posisiton), hence the need for me to specify “.value” to get the Vector3.
Terrain GetCurrentTerrain()
{
    //Array of all terrains
    Terrain[] totalTerrains = Terrain.activeTerrains;

    //Checks on length
    if (totalTerrains.Length == 0) return null;
    else if (totalTerrains.Length == 1) return totalTerrains[0];

    //closest terrain, Initialized with totalTerrains[0]
    Terrain closestTerrain = totalTerrains[0];

    //Center of terrain at totalTerrains[0]
    Vector3 terrainCenter = new Vector3(closestTerrain.transform.position.x + closestTerrain.terrainData.size.x / 2, playerPos.value.y, closestTerrain.transform.position.z + closestTerrain.terrainData.size.z / 2);

    //will be closest distance between player a terrain. Initialized with totalTerrains[0]
    float closestDistance = Vector3.Distance(terrainCenter, playerPos.value);


    //Iterate through list of all terrains
    for (int rep = 1; rep < totalTerrains.Length; rep++)
    {
        //currently selected terrain
        Terrain terrain = totalTerrains[rep];
        terrainCenter = new Vector3(terrain.transform.position.x + terrain.terrainData.size.x / 2, playerPos.value.y, terrain.transform.position.z + terrain.terrainData.size.z / 2);

        //Check on distance compared to closest terrain
        float d = Vector3.Distance(terrainCenter, playerPos.value);
        if (d < closestDistance)
        {
            closestDistance = d;
            closestTerrain = totalTerrains[rep];
        }
    }
    //Returns the closest terrain
    return closestTerrain;
}
So now that we have the closest terrain to our player, we need to convert the player’s position in the game to their position on the specific alpha map. This process looks something like this, noting that currentTerrain has just been set to whatever is returned by GetCurrentTerrain():
void GetPlayerTerrainPosition()
{
    //Player position relative to terrain
    Vector3 playerTerrainPosition = playerPos.value - currentTerrain.transform.position;

    //Player position on alphamap of terrain using offset
    Vector3 alphamapPosition = new Vector3 (playerTerrainPosition.x / currentTerrain.terrainData.size.x, 0, playerTerrainPosition.z / currentTerrain.terrainData.size.z);

    //Properly scales players x and z
    float xCoord = alphamapPosition.x * currentTerrain.terrainData.alphamapWidth;
    float zCoord = alphamapPosition.z * currentTerrain.terrainData.alphamapHeight;

    //Casts as int and sets
    xPos = (int)xCoord;
    zPos = (int)zCoord;
}
We get out of this call with now our 2 xPos and zPos fields set to the player’s coordinates on the terrain. All that’s left is to take these coordinates and get the alpha map at the player’s position, and determine which terrain texture is applied at that location. One important note is how alpha maps store references to textures. the alpha map is a 3d array where the third value refers to the texture being checked for. For example alphaMap[0,0,0] will return the strength of the texture in slot 0 of the terrain texture layer. alphaMap[0,0,1] will return the strength of texture in slot 1. Hence, splatmapping! We are able to interpolate on various combinations of strength of textures, not just simply player is or isnt on ice. Instead, we can say 30% ice, 70% regular snow, and have our movement variables adjust to that specific combination…. I’m getting off track, but just know this:
textureValues[] is an array of floats representing the strength of each texture at the specified x & z pos. The length of this array is simply set to the number of textures in our terrain layers.
here, rep is used to tie the corresponding spot in textureValues to the value of the texture in that slot of the 3d array
SetPlayerMovementVariables() is currently where we are interpolating on the data gathered here, but essentially the value is clamped from 0 to 1, representing how much of the splatmap at that point is of the texture in the corresponding spot in aMap, and from there we are setting values in our PlayerMovement script. Take a look!
//gets the float (clamped between 0 and 1) of how much of each texture is present at the x & z coord
void CheckTextureBelowPlayer()
{
    //Will store the alpha map of the current terrain
    float[,,] aMap;

    //Uses x position and z position to set aMap to correct alpha map
    aMap = currentTerrain.terrainData.GetAlphamaps(xPos, zPos, 1, 1);

    //textureValues stores the current stength of the texture stored in the corresponding slot in the alpha Map
    for (int rep = 0; rep < textureValues.Length; rep++ )
    {
        //stores stength of values at that point
        textureValues[rep] = aMap[0, 0, rep];
    }


    //Iterates through to check if any values are greater than 0
    for(int rep = 0; rep < textureValues.Length; rep++ )
    {
        //If terrain is present, sets player movement values
        if(textureValues[rep] > 0)
        {
            SetPlayerMovementVariables(rep, textureValues[rep]);
        }

    }
}
This flow of operations effectively allows my team’s PlayerMovement script to iterate as usual, but be fed different live values decided by the terrain type. So far this works really well for me, but if I find more to change and tweak, I absolutely will update it here! I hope this helps anyone who is setting out to do this themselves, much like I was a few days ago! Hope you enjoy the code!
Hello All! I’m deep in the semester currently (my second to last), but wanted to pop in here to try and share what I have been working on game wise! Firstly, if you haven’t checked out Liquidators yet, please please do! The game can be found on Steam and Itch.io, and you can read a little bit about the mission here. I worked as the Lead Producer and Designer of this project over the last year, and am SUPER proud of it. This has been taking up a fair amount of my time lately, as I have learned more about the “post-production” process. It has been amazing experience seeing our game played by so many online, and being received so well in reviews. We just passed 14,000 units today, and taking part in this awesome team has been one of the most fullfilling experiences in my life. Here is a video of Tomato Gaming playing Liquidators in a livestream… One of my favorite playthroughs so far!
Aside from post-production work on Liquidators, I have also been working on a new full year project. I have been working as the Lead Engineer on The Trials of Snowshoe Thompson. The game emphasizes a unique movement mechanic, and realistic skiing physics, to take players through a narrative experience based around the famed mail delivery worker, John “Snowshoe” Thompson. This is by far the largest project I have ever taken part of, with over 20 team members, and we hope to be finished with Alpha sometime in January. The project has truly tested me as an Engineer, and I have loved every second of it. I lead a team of 5 other Engineers, and so far the most rewarding part of the game is working with such hard working individuals. Communication is something I think is most valuable in a game development environment, and being entirely remote has presented me with some unique challenges, but having a hard working and dedicated team has really made these issues non-existent.
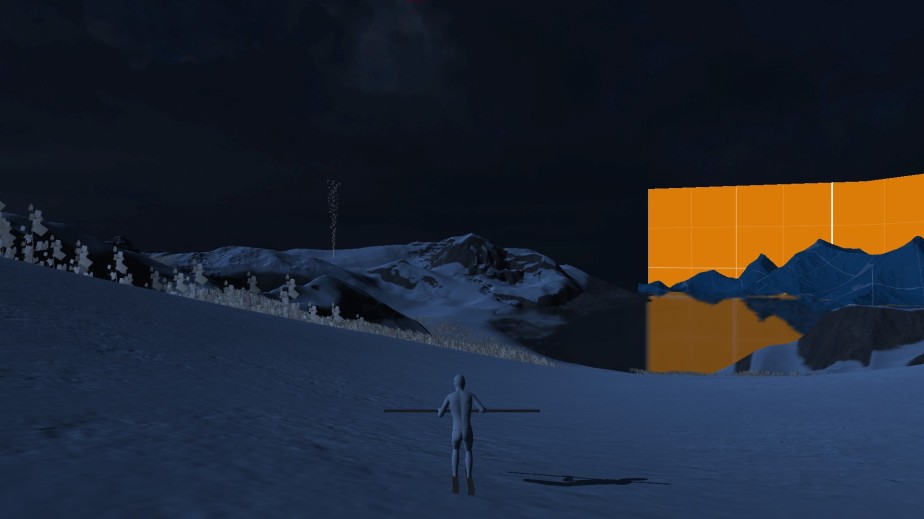
So far, our Engineering team has conquered a lot of ground… I’m not sure how much I should really be showing of this, but ANYTHING for my website… (and I’ll keep it pretty concise for now). We have almost completed the movement system which is meant to simulate a realistic skiing experience. Furthermore, we have implemented a unique style of map meant to entirely replicate how a traditional map would be used to triangulate one’s position. The mechanic utilizes a compass, and a functionality which aligns the Map’s north with the World’s north. Obviously there is a lot more at work, but these are the most unique systems that we have (and the easiest to show off here). If I had to highlight any specific code chunk as my favorite from the project so far, I would have to say it is how we are handling the Player movement state. The Player is currently under the control of a finite state machine, which has 3 states: Moving, Not moving, and Map. But the movement state contains a sub-state enum which allows us to pretty seamlessly (and realistically) play with the player’s ability to move in certain scenarios. For example, a substate in the Movement State is “Right Stride Window”, which allows us to track (from within our Movement State tick) when the window for another stride opens up, and then expect/adjust behavior accordingly. And then based on this behavior, the Player Script (not to be confused with the state tick) will operate and adjust the active substate, which is then fed back into the Player Movement State Tick… Here’s a clip of some of our skiing movement!
Please Excuse Debugs!
And then a clip of the Map in action!
I’d like to emphasize that this has been a team effort for all of what we have accomplished, and I don’t in any way mean to take credit for this. These have been a product of the hard work of my team, and I’m just lucky to have people who care enough about a good product.
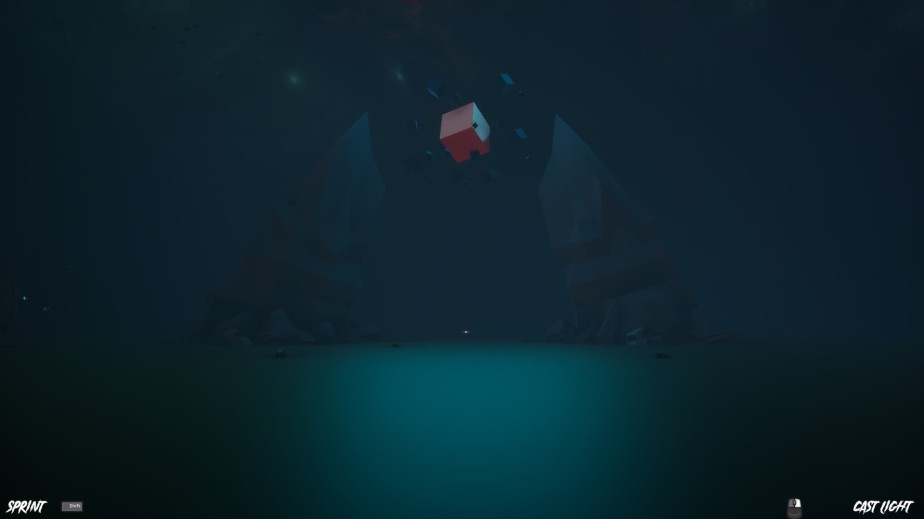
The final project that I’m currently working on is for a class, and the production takes place over about 6 weeks, but we plan to take this to a full vertical slice, by working through the month of December. So far, we are about 4 weeks in. The game currently has a working title of Wicker. The basis: You are being pursued. You must run through a storm of cubes to escape. The closer the pursuer gets to you, the faster the storm moves. Running through the storm slows you down. Left clicking clears a tunnel infront of you, right clicking places a light for you to see…. I’m not sure if that makes sense, but hopefully images and clips will help you understand!
I’m working on this project with the same team as made Boomer & Zoomer! I have been writing all of the code, and have really enjoyed my first venture into a “pursuer” style horror game. While we are still working on a lot of the horror aspects, we have finished a fairly comprehensive sound system which plays a pivotal role in one of our core mechanics. Essentially, players are following their ears, trying to reach an objective, while evading an ever pursuing AI. Here’s a clip of some gameplay we have:
Thanks for checking in guys! I really appreciate the continued support on my site! I’ll hopefully have something playable for you in the next post from both Snowshoe and Wicker.
Hello all, I’m very excited to announce today that I have finished up the production on Boomer & Zoomer, which is a 2 person endless runner that I worked on over the summer. I worked on the project as the sole engineer and primary designer, and worked alongside 2 fantastic teammates. A Composer, Zoe Morfas. and a 3D modeler & Designer Alan Karbachinsky. I was very lucky to work with them, and the game would not be where it is now if I hadn’t had these really talented people working with me. That said..
Boomer & Zoomer is a game which I played pretty much every single role on aside from 3D models/Animation and music. I’m not saying this to sound cocky… I hate the thought of that. I’m saying it because it is pertinent to the understanding of where the rest of this blog post will be going, which is a postmortem of my experience creating the 2 player endless runner that is Boomer & Zoomer. With all that said, I’m super proud to present you all with Boomer & Zoomer!
I encourage you to at least watch the above game play video before continuing to read the rest of this post! And… Download the game too!
Boomer & Zoomer Postmortem
It’s time to cut the bullshit. Boomer & Zoomer will from hereon be referred to as “B&Z“. Additionally, Player 1 will refer to the dog player (Zoomer), and player 2 to the boomerang player(Boomer). Sound good?
Creating fun through mechanics is perhaps, in my eyes, the most crucial pinnacle in design. If what the player is doing isn’t fun, what’s the point? If you can make what the player is mechanically doing while they play the game always fun, then that game will always be fun. And then we can get art in there to make it look good too!
B&Z started as an attempt to test the limits of the endless runner genre. Endless runners are generally associated with mobile games, single player, directional mechanics only. B&Z is a game meant to be played with Xbox controllers, by 2 players, which includes a combat system. And this is how it was designed to be, back when the project started in June! As far as features which we had planned and didn’t implement, there were none! In fact, feel free to checkout the Game Design Doc here! That is perhaps the most impressive thing about this project. In the attempt to push how an endless runner functions, I tried to rely heavily on a set of stable mechanics. These mechanics were the player’s throwing & catching interaction, the player’s abilities (& token system), and the player’s distinct movement styles.
Given that I feel so strongly about the mechanics in games, I would like to use this postmortem as an opportunity to reflect on the core mechanics which I listed above, from the perspective of both the designer & engineer.
Throwing and Catching
Designer
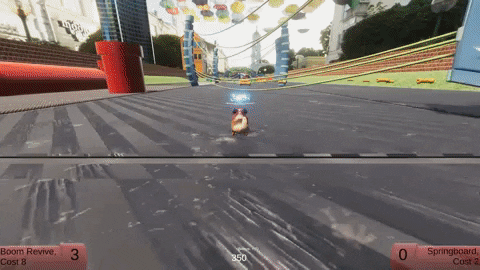
The interaction is simple, but core to B&Z. To throw: Player 2 uses their left stick to aim the the indicator projected in front of the players. Player 1 then taps A to start the throw towards the aimed area. Time immediately screeches to a quarter of it’s former speed. That’s right, we got SLOW MO! The camera begins to pull out from the tight focus on just Zoomer, as Boomer has now entered the playing field. Player 2 is hurled forward, moving ahead of Player 1. Boomer is moving faster than Zoomer, but is equally in slow motion. Any enemy (water balloon) or rope in the path from Player 2 to the aim indicator is obliterated as sparks fly everywhere. Player 2 has just been thrown! And time resumes normal speed.
To catch: Player 2 must navigate within 1m range of Player 1. Player 2 must hold down A and have it held while Player 1 taps A. This will complete the process of Zoomer catching Boomer! Players hear a quick click sound accompanied by an extremely quick but powerful controller vibration to confirm they’ve made the connection. The camera quickly transitions into the previous “Zoomer Only” view, and Boomer regains control of their aim indicator.
As the designer of these mechanics, looking back I think that I could’ve used stronger visual representations of the unique catching mechanic. While it’s simple in idea, testing proved that a lot of players struggled with that coordination. While the player’s “action logs” tell the players when they’re in range of pulling off a catch, it doesn’t visually represent what the boomerang player must do vs what the dog player must do. It does say it in text. But images and animated control UI really helps players understand unique mechanics such as this, and I wish that I had put something like that in. Additionally, I wish I had added more feedback for the throw process. While I like the slow mo, I feel like something is still missing from the feeling of the mechanic.
Engineer
Throwing and catching were very fun to work out in code, as I got to work with state machines which heavily depended on one another’s state. I talk a lot about that here, but basically my main reflections on these mechanics as an engineers is that I wish I had finer tuned the sensitivity of Player 2’s aim. The game is meant to be played with an Xbox controller, and therefore a joystick, but as the developer I spent most of my time playing on the keyboard controls. I feel player 2’s aim is the mechanic that took the hardest hit from this crucial misstep in my development process. The aim runs on the typical joystick scale of (-1) – (1), but the aim function is unfortunately not properly scaled to the speed at which a joystick moves through these values, resulting in the aim being extremely sensitive and fast to snap around on aiming,
Player Abilities
Designer
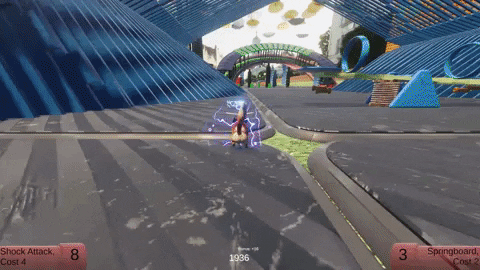
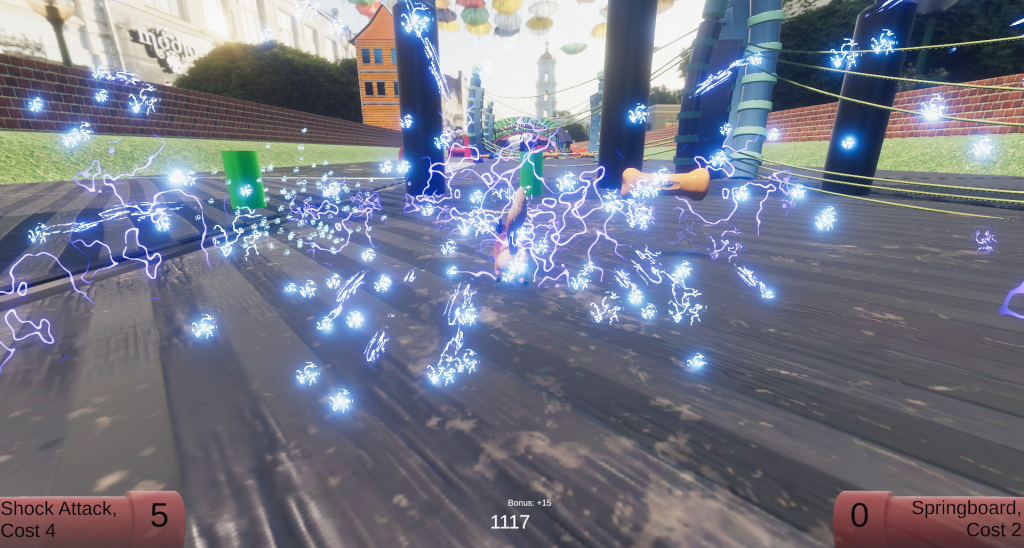
Player abilities were a wildcard in the design process. I was unsure exactly how they would turn out, because I hadn’t fully thought them out until I sat down to make them. That said, the end result I’m really proud of. The abilities in this game depend upon ability tokens gathered while playing. I tried to first associate heavy feedback with collecting the ability tokens. I did this with crumbs flying everywhere when the player collects them, a satisfying click sound, & with a subtle vibration to the player who collected the token. This feedback is then meant to reach a big “payout” when player’s use their tokens. A description of all player abilities can be found in the above design doc, but for our purposes I’ll break down Zoomer’s Shock Attack. The shock attack sends a flurry of lightning across the ground and sparks up into the sky, as all nearby water balloons melt away. In addition to the visual feedback, the player receives a really nice ($3) shocking sound and controller vibration ringing so long as the ground is laced with lightning. Of all the mechanics in my game, I believe the ability mechanics to be the most fun simply because of the assortment of feedback and dynamics presented into the game through them. That said, nothing is without flaw.
If I were to have a second shot at making these mechanics I would better map out how they would interact with one another. I formed each ability independent of the others, and because of that none of them are specifically designed to interact with one another. Of course the dynamics generated by my abilities and how they do interact are really cool and fun! But the abilities were not designed with that specific intent/interaction in mind. I would like to see what abilities would have looked like if I had considered allowing them to interact / play off one another.
Engineer
The primary reflection I have on the engineering side of the ability mechanics is how I stored the particle systems & visual effects used by the ability tokens and abilities themselves. I wish that I had taken the time to build out a better system for instantiating and storing instances of these specific particle sysyems. The way it works right now, unfortunately, is each token collection instantiates a new particle system, but these are unpooled and remain assigned to the specific instance of that token. When I made this I knew it was not efficient, and I’ve written object poolers in the past, but I just got lazy on this one and I really do regret it.
Player Movement
Designer
One of the things I learned the most about in the production of B&Z is that about the importance & difficulty in pinpointing perfect player movement, From the design approach, I wanted the boomerang to feel free and fast. Meanwhile, the dog was to be easy to control and “medium” speed. One of the main design points of the game is that the boomerang player can move along the forward to back axis while the dog player is locked moving forward at a constant rate. This was the gameplay idea that started the entire project, and I’m still very happy with it.
Things I would do differently is a loaded question… mostly because the things I would do differently I wouldn’t be able to do myself, & therefore couldn’t have done for this project. But the main highlight would be stronger visual representation of the player’s movements. Both the boomerang and dog. For Zoomer, I would’ve liked to have an animation to better represent the player’s left and right movement. Right now, the dog just rotates and faces the direction they’re moving, but it doesn’t look great because the dog moves forward at a constant rate. On the reverse end, the boomerang is difficult to see. I added an indicator over the boomerang for when they are reaching questionable visual territory and it helps. But it doesn’t fix the issue that the boomerang itself is hard to see. My solution to this (If I had unlimited resources) would to be creating some sort of secondary camera overlay. Not even necessarily meant to be the main camera used by Boomer but more-so a supplementary angle from above their location, helping them identify their own surroundings. Then ideally taking that second camera output to dynamically work with the current player positions to display additional input for Player 2. However, that would be out of the scope of this already kind of out of scope plan, and would take a lot of dedication to get to work right.
Engineering
This game was made in Unity, and in Unity we use Rigidbodies to enact physics on our game object. One of the big turning points in the engineering of this game is when I decided to remove the rigidbody from my player game objects, thus removing them from the physics of the scene. Instead I moved the players using their transform, and directly feeding the player objects a new location each frame, for each player. Having control of the player’s location like that allowed me to build my own sort of constraints on player movement that I like to think turned out pretty well, especially in the case of the boomerang. The movement is meant to reflect the unpredictability of a boomerang… while also remaining fair and in the control of the player. It slows down and speeds up at random intervals and flies in small circular rotations within a larger space, taking up more room that its unmoving collider.
Conclusion
B&Z took a lot of effort and hard work, but I feel that it shows in the final product. No game is ever really finished, but in B&Z’s case we set out with specific intentions, clearly planned out scope & schedule, and defined personal goals, and I believe that is showcased in the final project, making this game complete to us.
My personal goals were to try and test myself creatively, to work on my ability to think up & build out fun mechanics, and to fit this all into a well thought out & efficient game architecture. While nothing is ever perfect, I am satisfied with effort toward achieving these goals. For a personal project over the summer, I’m very happy with the outcome.
I am so grateful to have worked with such a great team, who really brought this game to life artistically. Boomer & Zoomer can be downloaded above!
Hello All! As with the last few posts up here, I hope every one of you is well and staying safe amidst Covid-19. To say we are witnessing history is an understatement. We are actively participating in history, as Covid has proven to be something which permeates all facets of life, for all. That said, I have continued to use my newfound free time to work on the same 2 projects I posted about last time. That post, of course, included the download link to the “Liquidators” demo, a year long project which is planning for a release on steam in the coming month, as well as a break down of a personal project I am still currently finishing up with a friend!
This project, which we have taken to calling “Boomer and Zoomer” (It wasn’t my idea)(I know, I’m sorry), has served as a great experience for me, as I have handled all Engineering. Everything from the audio manager to the shaders in the game, I have been the one responsible! And I have really enjoyed it! I post here today not to share code, but instead the most up to date build!
A little about the game:
It is a 2 player endless runner
It requires an Xbox (one or 360) controller
In its current state it has no tutorial (I will be working on this week)