Hello all! I just wanted to make a quick post to give my site an update on what I’ve been up to! This past week, I finished my degree & graduated from USC with a BA in Interactive Entertainment. After being an undergrad student for 6 years, I am more than ready to enter the industry and begin to work & learn in a professional environment. I am very grateful for the experiences I gained from working on games at USC, and today I’m proud to show off the game that I worked on over the past year as a part of USC Games.
The Trials of Snowshoe Thompson is a game I worked on as the Lead Engineer, alongside a team of 5 other engineers. You can see posts here about the development process of Snowshoe, but in short: our goal as engineers on this project was to recreate the feeling & physics of realistic cross country skiing. I am very proud of how this project turned out, and greatly value the lessons I learned in the process. I most enjoyed being able to work on large scale Unity architecture, and working alongside very brilliant engineers.
I may eventually come back and write a more reflective post on this project, but for now I am going to leave just the link to the download, and hope you are able to enjoy it! You will need a playstation or xbox controller to play the game!
Hello all, this is a walkthrough of my solution for detecting the device that the player is using in a single player “gamepad” based game. In my specific case, I’m using this information to have my UI constantly represent the correct “controls” UI for the type of device my player is using. At the time of writing this, my system is specifically built to sort between PlayStation & Xbox controllers, with Xbox being the default. With that said, this system is easily extendable, and I hope that will be clear through my code & explanations. This guide is meant to help those who have routed all of their input beneath the “game pad” umbrella in the Unity Input System, but still want the specific type of controller used by the player to be accessible.
This post is using the “New” Unity Input System, NOT the Unity Legacy Input
I ran into a lot of very interesting road blocks in my quest to create an abstracted UI Image system which would live react to the type of controller being used by the player…. It sounds funny, because you would think it would be simple to detect the type of controller being used by the player, but the way that the Unity Input System deals with game pad style controllers seems to do a pretty good job of burying this data.
There were 2 ways which I thought I could approach this. The first would be to go into my actual Input Map and specify control schemes by controller type, and then have a manager which detects input from any/all control schemes. and switches state based upon the most recent input. I chose not to do this because, in my opinion, one of the biggest appeals of the Unity Input System is that it supports the most common controller types all beneath the gamepad umbrella.
It’s important to note that in my project, I have my PlayerInput Behavior set to Invoke C# Events.
My first step in this system was listening in to the InputSystem.onDeviceChange, which must be assigned to a function which takes an InputDevice and InputDeviceChange. This event will fire off every time a change to device is detected. These include a controller being: added, disconnected, removed, & reconnected. InputDeviceChange represents which one of these events was detected. Here’s what those look like:
Note: _currentController is just a basic enum meant to internally store the controller state
    private void GameManagerRegisterInput()
    {
        //Binds onDeviceChange event to InputDeviceChanged
        InputSystem.onDeviceChange += InputDeviceChanged;

    }

    //Method called  when a device change event is fired
    private void InputDeviceChanged(InputDevice device, InputDeviceChange change)
    {
        switch (change)
        {
            //New device added
            case InputDeviceChange.Added:
                Debug.Log("New device added");


                break;

            //Device disconnected
            case InputDeviceChange.Disconnected:
                controllerDisconnected.Invoke();
                Debug.Log("Device disconnected");
                break;

            //Familiar device connected
            case InputDeviceChange.Reconnected:
                controllerReconnected.Invoke();
                Debug.Log("Device reconnected");


                break;

            //Else
            default:
                break;
        }
    }//Method called  when a device change event is fired
    public void InputDeviceChanged(InputDevice device, InputDeviceChange change)
    {
        switch (change)
        {
            //New device added
            case InputDeviceChange.Added:
                Debug.Log("New device added");

                //Checks if is Playstation Controller
                if (device.description.manufacturer == "Sony Interactive Entertainment" && _currentController != CurrentControllerType.PlayStation)
                {
                    //Sets UI scheme
                    Debug.Log("Playstation Controller Detected");
                    currentImageScheme.SetImagesToPlaystation();
                    _currentController = CurrentControllerType.PlayStation;
                    controllerTypeChange.Invoke();
                }
                //Else, assumes Xbox controller
                //device.description.manufacturer for Xbox returns empty string
                else if(device.description.manufacturer != "Sony Interactive Entertainment" && _currentController != CurrentControllerType.Xbox)
                {
                    Debug.Log("Xbox Controller Detected");
                    currentImageScheme.SetImagesToXbox();
                    _currentController = CurrentControllerType.Xbox;
                    controllerTypeChange.Invoke();
                }
                break;

            //Device disconnected
            case InputDeviceChange.Disconnected:
                controllerDisconnected.Invoke();
                _currentController = CurrentControllerType.Other;
                Debug.Log("Device disconnected");
                break;

            //Familiar device connected
            case InputDeviceChange.Reconnected:
                controllerReconnected.Invoke();
                Debug.Log("Device reconnected");

                //Checks if is Playstation Controller
                if (device.description.manufacturer == "Sony Interactive Entertainment" && _currentController != CurrentControllerType.PlayStation)
                {
                    //Sets UI scheme
                    Debug.Log("Playstation Controller Detected");
                    currentImageScheme.SetImagesToPlaystation();
                    _currentController = CurrentControllerType.PlayStation;
                    controllerTypeChange.Invoke();
                }
                //Else, assumes Xbox controller
                //device.description.manufacturer for Xbox returns empty string
                else if(device.description.manufacturer != "Sony Interactive Entertainment" && _currentController != CurrentControllerType.Xbox)
                {
                    Debug.Log("Xbox Controller Detected");
                    currentImageScheme.SetImagesToXbox();
                    _currentController = CurrentControllerType.Xbox;
                    controllerTypeChange.Invoke();
                }
                break;

            //Else
            default:
                break;
        }
    }    private void GameManagerRegisterInput()
    {
        //Binds onDeviceChange event to InputDeviceChanged
        InputSystem.onDeviceChange += InputDeviceChanged;

    }

    //Method called  when a device change event is fired
    private void InputDeviceChanged(InputDevice device, InputDeviceChange change)
    {
        switch (change)
        {
            //New device added
            case InputDeviceChange.Added:
                Debug.Log("New device added");


                break;

            //Device disconnected
            case InputDeviceChange.Disconnected:
                controllerDisconnected.Invoke();
                Debug.Log("Device disconnected");
                break;

            //Familiar device connected
            case InputDeviceChange.Reconnected:
                controllerReconnected.Invoke();
                Debug.Log("Device reconnected");


                break;

            //Else
            default:
                break;
        }
    }
While this was the first step I took, I was working backwards a bit. With this event being listened to, we can react to new controllers being connected, to controllers losing connection, and a bunch of other events. These events usually represent a reason to re-evaluate the current images being displayed for controls.
I wrote a fairly simple Scriptable Object which holds all the textures we will be using in our “controls” UI. So this scriptable objects holds all the images used to represent xbox and playstation controls. Additionally, it has a set of private textures which hold the “current” image for that button. Through this abstraction, I can have the Scriptable Object flip it’s set of “current” images, and have all UI read from this ScriptableObject for the image it needs to display.
Now that I had the foundation, and a way to store/represent the “controller type” state, now I just needed to determine what type of controller was being connected/added, and pass that state on to my Scriptable Object. Using the API for the type Device, which is passed on this event as a direct reference to the Device that instigated the event, I was able to determine that the field description has sub fields which are used to define the specific type of controller, the manufacturer, and more. The field product is a string which would come out something like “Dual Shock 4” or “Xbox One Elite”. While this is certainly useful, I wanted things to remain as generic as they could be. The manufacturer proved to be the most abstracted I could get, while still distinguishing between the specific types of gamepads. However, herein lies the first issue I encountered. While the device.description.manufacturer field on a Playstation controller returns a nice & neat “Sony Interactive Entertainment”, that same field for the Xbox controller is entirely empty. Since I only have to support the 2 types, I wrote these conditions into an if/else, and called it a day. But as I extend the system to include more controller types, I would make use of the device.description.product and distinguish between the remaining types of controllers. Here’s what that same chunk from above looks like with these cases written in.
A note: currentImageScheme is my Scriptable Object described above. This scriptable object provides the texture to raw image prefabs in my UI. controllerTypeChange is an event which is listened to by the UI. The UI will react to this event by setting their texture to the “current” texture stored in the ScriptableObject
//Method called  when a device change event is fired
    public void InputDeviceChanged(InputDevice device, InputDeviceChange change)
    {
        switch (change)
        {
            //New device added
            case InputDeviceChange.Added:
                Debug.Log("New device added");

                //Checks if is Playstation Controller
                if (device.description.manufacturer == "Sony Interactive Entertainment")
                {
                    //Sets UI scheme
                    Debug.Log("Playstation Controller Detected");
                    currentImageScheme.SetImagesToPlaystation();
                    controllerTypeChange.Invoke();
                }
                //Else, assumes Xbox controller
                //device.description.manufacturer for Xbox returns empty string
                else
                {
                    Debug.Log("Xbox Controller Detected");
                    currentImageScheme.SetImagesToXbox();
                    controllerTypeChange.Invoke();
                }
                break;

            //Device disconnected
            case InputDeviceChange.Disconnected:
                controllerDisconnected.Invoke();
                Debug.Log("Device disconnected");
                break;

            //Familiar device connected
            case InputDeviceChange.Reconnected:
                controllerReconnected.Invoke();
                Debug.Log("Device reconnected");

                //Checks if is Playstation Controller
                if (device.description.manufacturer == "Sony Interactive Entertainment")
                {
                    //Sets UI scheme
                    Debug.Log("Playstation Controller Detected");
                    currentImageScheme.SetImagesToPlaystation();
                    controllerTypeChange.Invoke();
                }
                //Else, assumes Xbox controller
                //device.description.manufacturer for Xbox returns empty string
                else
                {
                    Debug.Log("Xbox Controller Detected");
                    currentImageScheme.SetImagesToXbox();
                    controllerTypeChange.Invoke();
                }
                break;

            //Else
            default:
                break;
        }
    }
So remember when I said I was working backwards? At this point, my system detects and reacts to big controller events, but at the start of the program has no idea what controller is being used. This is where I encountered the majority of my hardship, but I’m very proud of the end result!
Something I learned quickly is that the Unity Input System stores all known input devices, regardless of them being currently connected or not. So if my player is playing on their xbox controller, it’s batteries die, and they switch to their PS controller, InputSystem.devices still stores both devices. Additionally, while the type Device has a property enabled, this returns true for all devices registered to the Unity Input System. So all of this results in perhaps the most notable roadblock I encountered with this System: I could not find a way in which the Unity Input System distinguishes between the currently connected/in use controllers and those which are simply known by the Unity Input System, ie not in use at all. Devices can easily be individually assigned, and switched between, and detected, but there is no property of the Type Device (that I could find) which represents whether an individual device is actively connected. I pray I’m wrong about that, but the closest I could get was InputDevice.lastUpdateTime, which InputSystem inherits from. Even that field returns extremely unreliable values, as on PS it counts gyroscopic data as input, every frame, and in my tests, was returning the same value for all my devices, connected or not.
TlDr; I could not find a way to distinguish between connected and non connected input devices.
My response to this, however, is where I’m most proud of this code! I found that if I remove all the stored devices on game start, the controller being used by the player instantly re-constructs itself, and is quickly the only device stored in InputSystem.devices[]. From here, it’s easy to just check InputSystem.devices[0].manufacturer, and we have the same check on game start as we do when a controller event happens. Here’s that code!
Once again, currentImageScheme is my SO
//Called in GameManagerGameStart() to set the UI initially
    private void UIImageSchemeInitialSet()
    {
        //Disables all devices currently read by InputSystem
        for (int rep = 0; rep < InputSystem.devices.Count - 1; rep++)
        {
            InputSystem.RemoveDevice(InputSystem.devices[rep]);
        }

        if (InputSystem.devices[0] == null) return;

        //Checks the first slot of the InputSystem devices list for controller type
        if (InputSystem.devices[0].description.manufacturer == "Sony Interactive Entertainment")
        {
            //Sets UI scheme to PS
            Debug.Log("Playstation Controller Detected");
            currentImageScheme.SetImagesToPlaystation();
            _currentController = CurrentControllerType.PlayStation;
            controllerTypeChange.Invoke();
        }
        else
        {
            //Sets UI scheme to XB
            Debug.Log("Xbox Controller Detected");
            currentImageScheme.SetImagesToXbox();
            _currentController = CurrentControllerType.Xbox;
            controllerTypeChange.Invoke();
        }
    }
From there, to complete my system, all I had to write was a MonoBehaviour which stores a reference to my SO, and listens to my controllerTypeChange event, reacting by just setting its image to the corresponding image stored in the Scriptable Object. Here’s that code, for those who are curious!
public class ControllerImageScript : MonoBehaviour
{
    public UIImageSchemeSO uiImageScheme;

    public enum buttonImage
    {
        southButton,
        eastButton,
        northButton,
        westButton,
        rightTrigger,
        leftTrigger
    }

    public buttonImage myButtonImage;

    private RawImage myImage;

    // Start is called before the first frame update
    void Start()
    {
        myImage = gameObject.GetComponent<RawImage>();
        SetButtonImage();
    }

    public void SetButtonImage()
    {
        if (myButtonImage == buttonImage.southButton)
        {
            myImage.texture = uiImageScheme.GetSouthButton();
        }
        else if (myButtonImage == buttonImage.eastButton)
        {
            myImage.texture = uiImageScheme.GetEastButton();
        }
        else if (myButtonImage == buttonImage.northButton)
        {
            myImage.texture = uiImageScheme.GetNorthButton();
        }
        else if (myButtonImage == buttonImage.westButton)
        {
            myImage.texture = uiImageScheme.GetWestButton();
        }
        else if (myButtonImage == buttonImage.leftTrigger)
        {
            myImage.texture = uiImageScheme.GetLeftTrigger();
        }
        else if (myButtonImage == buttonImage.rightTrigger)
        {
            myImage.texture = uiImageScheme.GetRightTrigger();
        }
    }
}
I spent all day on this code, and I found it a surprisingly underdocumented topic. I hope that this proves helpful to those who are in my situation, just as all the wonderful discussions/threads online helped me!
Hello all! Happy winter! I wanted to write a post today to document and detail what I have been working on over my winter break from school! As I had briefly mentioned in my October Update, I am currently working on a Vertical Slice of a horror game, which is now confidently titled The Wicker. I have been working on this side project with 1 other developer since October, and we are approaching the final sprint of our development. I have worked as the only Engineer and have worked together with my partner (Alan Karbachinsky) on the design of this game. Additionally, we have been working with a composer, Zoe Morfas, to provide music and SFX for our highly sound centric design.
The Wicker is played on the Mouse and Keyboard, and experiments with using abstract environmental feedback as a means of communicating game state to the player. The experience goal of this game is to make the player feel as though they are attempting to solve a puzzle with a blindfold. A dark and constantly unsettled abstract arena is accompanied by another entity’s looming presence, causing discomfort and fear. Additionally, we hope to instill uneasiness in players through interpretation & understanding of environmental factors. Below, I would like to breakdown some of the nuances and highlights (in my personal opinion) of the design of my WIP game, The Wicker.
Overview
As always… please excuse gif quality!
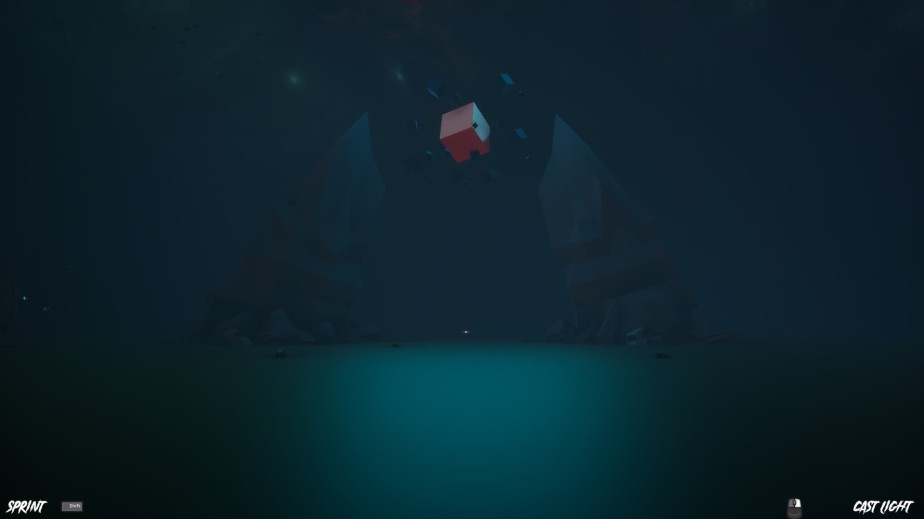
Players are spawned into a 3 dimensional environment, surrounded by suspended and spinning cubes (shown above). Players can walk through these suspended cubes, which disappear upon contact, but the player is slown down by this. The environment is dark, and players hear a constant ambiance “drone” (which is being played through a low pass). Players use general WASD movement and First Person mouse input to move and turn. Holding shift allows players to sprint, endlessly, but they are slowed to the same speed upon walking into a cube. Using the mechanics here and below, players are tasked with finding the seer eye, and delivering it to the socket. Both of these objectives are hidden in the game arena, which takes a sprinting player about 45 seconds to traverse along the x axis, and 25 along the y axis.
The Game Loop:
The “30 Second Test” Loop:
Mechanics
Create Tunnel – Left Click: Casts forth a conjured wall from the player, in the facing direction. This wall removes all suspended cubes it comes into majority contact with. This is used by players to create pathways down which they can move, unhindered by the slowing effect of the cubes. This wall moves much quicker than the player. This ability is on a 5 second cooldown.
Cast Light – Right Click: Casts forth a light orb from the player, in the facing direction. This light orb provides some light as it moves through the air, but upon contact with a cube it will turn that cube into a light cube, greatly illuminating the surrounding area. This light orb moves only slightly quicker than the player’s sprint speed, and will expire after 7 seconds uncontacted. This ability is on a 7 second cooldown.
Note the HUD in bottom righthand corner
Connect with Objective – Mouse Input: To understand where the current objective is located, players must use their mouse to look in a full circle, and proceed in the direction indicated by both an audio stimulus (low pass filter removed from the ambiance drone) and a UI indicator (a music note in the bottom right hand corner). This mechanic is a simple collider on the objective and raycast from the player forward, but I have attempted to utilize the affordances of this schematic to our advantage. The Objective (which has the collider on it) is programmed to manipulate the size of the collider, as well as just outright disable it for brief moments. This dynamicity adds a nice touch of uneasiness in one of our core mechanics. An example of this in action would be if a player is pursuing the direction in which they receive the auditory & visual cures, this is because their raycast is hitting the objective collider. but as they pursue that direction, their raycast may lose contact with the collider, causing their cues to cut out, and forcing them to realign to the movement of the objective collider. This mechanic is something I worked a lot on in the beginning of production, and I feel has turned out very fun. I was BEYOND excited to see an extremely similar (pretty much identical(and much more polished)) mechanic present in Spider Man: Miles Morales, released a few weeks ago (The Sound Sample minigame located throughout the map).
The Spirit
Players are being pursued. The spirit AI is trying to stop the player from bringing the eye to the socket, and although the AI itself is a simple navigation mesh agent, I have tried to create complexity through the affordances of such a style of pursuit. For those unfamiliar, nav-mesh agents are given a destination, and will pursue at a set speed, along specified meshes. In The Wicker, this destination is set every frame to be the player’s current location. However, since the player spends a majority of their time moving, this often leads to the AI approaching the player from behind. This was something we didn’t want, as we thought the player should always be able to witness the spirit…. atleast a little. Instead, I began to view the nav-mesh agent component of the enemy as more of a dynamic timer: in a constant pursuit of the player, at a manipulated speed, but with the mesh renderer disabled entirely, and just counting down until it will trigger an actual enemy encounter. This count down is dynamic because it is affected by the player’s movement. In more plain terms: The nav-mesh agent has no visual representation while it is in pursuit of the player. The enemy is simply an invisible collider in pursuit of the player… however, once this AI reaches the player, this begins what we have dubbed the encounter sequence, which is where the player will actually run the risk of being dragged to their death by the spirit.
Encounter Sequences
Once the invisible nav mesh agent has reached the player’s position, 1 of 2 things can happen.
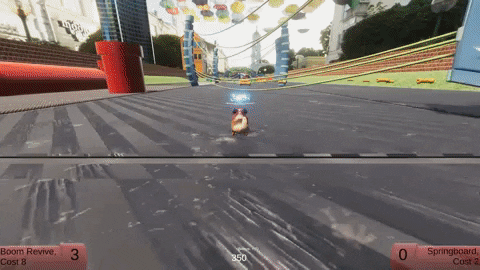
The first thing: The AI is teleported to 1 of 5 positions in front of the player, and an encounter begins. The encounter is indicated by an audio cue (screams), an environmental cue (change of color of light cubes and directional light), a “juice” cue (camera shake), and then of course the appearance of the enemy. The enemy’s mesh renderer becomes enabled during an encounter sequence, and the enemy is now pursuing the player head on. The teleport locations are relative to the player’s position & rotation, and are at such a distance from the player that the enemy spawning is un-rendered by the player camera. Additionally, there is a slight (purposeful) delay between the enemy appearing and the cues listed above^. This is done to help time-up the player & AI’s encounter with the mood shift of the level, while still indicating to the player that they are in immediate danger. This style of encounter ends when either the player creates enough distance between themselves and the AI, or the AI catches the player. This sequence can also be escaped by placing the eye in the socket, and thus winning the game.
The second thing that can happen is the AI “fakes out” the player. In an effort to create the mood of uneasiness, I added this style of encounter which has the same probability as all other encounters (specifically the AI is either teleported to 1 of the 5 positions above, or sent into this “fake out” sequence). In the fake out sequence, the enemy is first made visible far out in front of of the player. This is where the “encounter” cues are enabled, all the same as the above encounter type, but with the use of a specific audio. The AI’s position is then lerped from there to directly in front of the player. Right before it runs through the player, the enemy vanishes, a low pass filter is applied to the specified audio, and the bot is teleported to it’s spawn location. Then the encounter sequence ends (the AI becomes invisible and all encounter indicators are disabled).
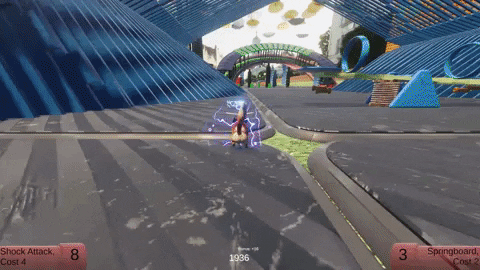
Here I’d like to share the progression of the “fake out” in a few gifs.. Please ignore T-pose, still in development! Top: Experimenting with working a “fake” encounter into my existing system. Middle: Added position lerp and environmental reaction. Bottom: Added a new shader meant to conceal the unrealistic movement of a direct position lerp.
Movement
To avoid the simplicity of the generic nav mesh agent pursuit, I created a unique movement scheme meant to give the agent a more frightful approach (in one of the normal encounters). So, just to clarify, while the enemy AI is invisible (and essentially a dynamic timer), this movement scheme is NOT being used. This movement solution is only for when an actual encounter (non fake out) begins. The first thing I did was give the AI 6 children locations (which move relative to the AI’s position) that it could choose to move to. All are in front of the AI (aka the direction it is heading), with 3 to the AI’s left and then 3 mirrored on it’s right. Then, I placed the AI’s movement in a thread where, upon reaching a set time interval, it will teleport itself to one of the nearby child locations, randomly. This worked well, and was very promising with how unsettling the movement felt, but it was still rusty and missing something.
To try and mask the obvious teleporting of position, created a second thread within the initial one mentioned above. This thread will be called once per movement interval, and essentially applies 1 of the 3 shaders we have for our enemy, randomly. Our enemy shader is brilliant, and the only thing in this game we have not produced ourselves. All credit to Inan Evin on the Unity Asset Store. This “glitch” shader proved to be very customizable, and we were easily able to transform them into proper “horror” material. Adding these shaders into the movement quickly made the movement more fear inciting, as well as masked up the “transitions” in the movement scheme I had built. Here’s a gif of it all put together!
Abstract Environmental Feedback in The Wicker
One of the core features of The Wicker that I have not yet touched on is the significance of the spinning cubes. This is one of the many things in our environment which we are trying to use to communicate the game state to the player. With The Wicker, we set out to toe the line of how little information we would directly be giving to the player for them to understand our complex game. This has proven an immense task in design, but one of the ways we chose to address this was using the environment to communicate with the player. The ways in which we have chosen to do this are all in pursuit of an visual aesthetic goal of minimalism, and other worldly-ness, and “play feel” aesthetic of curiosity & fulfillment, relying heavily on pattern recognition, and all with a tone of horror, of course!
The spinning cubes, and more specifically the speed at which the cubes rotate represents how close the enemy AI is to the player IN ALL STATES. So even while the AI is invisible, and a dynamic timer, the cubes are still spinning relative to how close the AI is to the player’s position (with SODA I’m sure you see how this is so easy). Managing literally thousands of cubes is no small task, and I opted out of using ECS. So all of the managing of my cubes comes down to rigorous abstraction from cube, to individual “storm unit” (around 90 cubes), and then to a storm manager. The storm manager controls which cubes are rendered (once again relative to players location(SODA, DUDE!)). The storm manager also dishes out the tick to each individual storm unit, which then rotates each cube accordingly. The spinning of the cubes set out to do 2 things: Tell the player about their position relative to AI and incite an uneasiness/faster pace while the AI is near.
The lights in The Wicker are another facet through which we try to communicate the game state to the player. As can be seen in many of the gifs above, the default lighting color of all lights in the game is either a bright purple(player spawn light), or a purplish-pink(lights cast by player). However, upon an enemy encounter, all lights in the scene are changed to a deep red for the duration of the encounter. This, in turn, not only signals to the player the beginning of an encounter, but the end to one as well. This feature of the lights is what adds the most value to the “Cast Light” mechanic. Ideally, players are using their lights throughout the duration of the game, and by placing them throughout the arena they are able to better understand the state of their encounter. In addition to turning the light cubes color, other environmental lights are also signaled on the event of an encounter, and switch to the same deep red. This includes the spawn light and the directional light.
The ambiance is another extremely important indicator to the player. While the player is faced away from the current objective, the ambiance audio (a mild drone and occasional chirps) is played under a low pass audio filter. However, when the player is facing the current objective, the frequency cutoff of the low pass is disabled, creating a noticeable jump in audio, which is also synced up with a UI indication on the player’s screen. In our playtesting, we found that allowing players both the visual and audio cue made it easier to understand that there may be an interest in continuing that direction. Our use of the ambiance in this way has become one of the integral features to one of our core mechanics, “connect with objective”.
Tutorialization of Our Unconventional Game
Left Image: the Hub a few months ago. Right Image: the Hub a few minutes ago. Note: time is relative.
Up to this point, all I have discussed is what me and my peer consider to be the actual game, however it is not the only part of our experience. In fact, it’s not the front facing part of the experience at all. Players spawn into The Wicker in the “Hub”. This hub is where we have placed all the tutorialization of our game. The Wicker has not been an easy game to teach people… as I’m sure you understand at this point in the post! There is a lot of intended “learn on your own” moments. With that said, we have worked hard to tutorialize in a way that would remain true to our aesthetic goals, and came onto 5 main solutions. Within the hub, players are not pursued, and they interact with the environment to become familiar with their surroundings, before being led to a teleport into the “actual” game.
Interactable environmental “signs” in the hub, which host pop-up text, are an extremely effective way of communicating a LOT of information while remaining within an extremely realistic scope. Through a simple event based prefab, multiple of these were placed around the hub. To stay to the intended aesthetic, the text is carefully written, and my teammate has modeled an awesome “obelisk” with etchings on the side, which are tied to the interactable text pop-up. These give our hub some visual depth, as well as a platform from which we can communicate necessary tutorial information to the player’s who seek to complete the experience.
Scrolling mechanic explanation HUDs at the bottom of the screen, which are only present while in the hub, have become a useful tool for us. We use this “scrolling text” (4 tips which alternate in 5 second intervals of being displayed at the bottom of the screen) as an opportunity to explain the core mechanics of our game, as well as delineate the Hub area from the main game. When players enter the “actual” game, this UI disappears completely, but reappears as soon as the player is back in the hub. This is meant to create a more “tutorial” representation of the hub in the player’s mind, and separate it from the actual experience.
Theeye and socket serves 2 great purposes. Firstly, it allows players to interact with the eye & socket mechanism, which helps create familiarity when they encounter it in the “actual” game. Secondly, once the player places the eye in the hub socket, a light appears and leads them towards a bright light in the distance. Upon approaching that light, players hear a “drone” noise getting louder and louder. As the players walk into the blindingly bright light, the noise now begins to gain heavy bass (as a low pass filter is lifted). Just as the noise reaches max volume and weight, it cuts completely silent. The screen remains blinded by light, but the player has actually been teleported out of the hub, and into the main game arena for the beginning of the game.
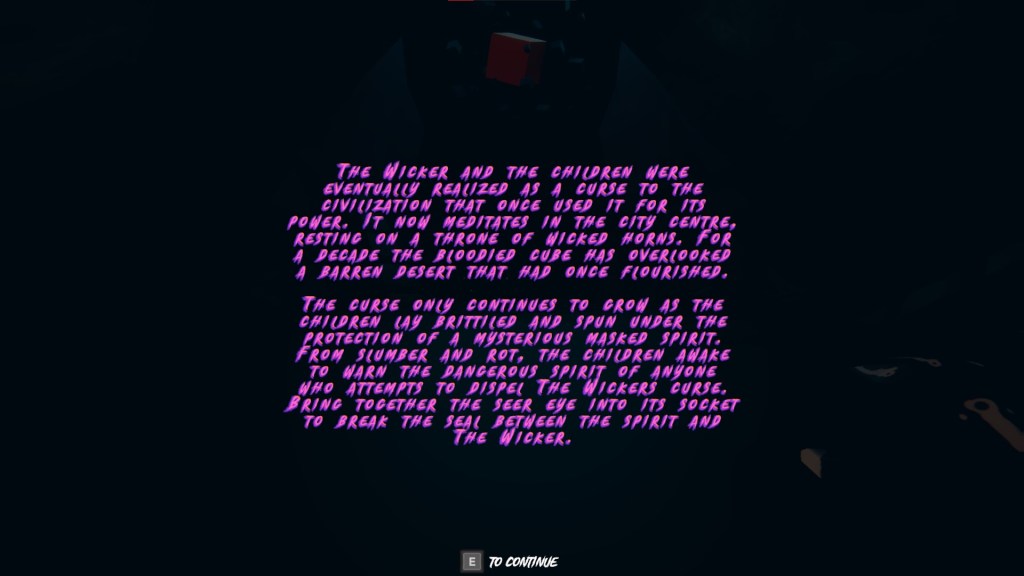
A splash screen was good enough for Start Wars, so it’s good enough for us. By splash screen I mean at the beginning of the game, when the player enters from the menu, a chunk of text pops up on their screen. The text is meant to heavily adhere to our aesthetic, but beneath the cryptic language it depicts the general goal of the game. Bring the seer eye to the socket. Additionally, having this text upon entry into the game helps to set the narrative tone of the game.
I told you it’s cryptic!
A comprehensive narrative direction is foundational to all the other solutions listed above, as it helps us adhere completely to our aesthetic goals, and create an equally unsettling and intriguing experience for the player. Additionally, writing some background on the world in which The Wicker takes place has helped give us a narrative voice through which we can use to communicate with the player, while staying true to our aesthetic goals.
Final Thoughts
The Wicker has been a real amazing game to work on. I have enjoyed both the engineering and design side of the project, and am excited to see it finally taking a form which is more true to our expectations for the project. As I mentioned above, we are entering the final sprint in this coming week, and plan to have a “release candidate” build probably sooner than that 2 week sprint ends. I will absolutely be posting the itch link here, and it will of course be free. I’d like to leave you, for now, with a gameplay video! This will hopefully be good reference for understanding all the audio mentioned above. Thanks for reading, and have a great day!
Hello All! I’m deep in the semester currently (my second to last), but wanted to pop in here to try and share what I have been working on game wise! Firstly, if you haven’t checked out Liquidators yet, please please do! The game can be found on Steam and Itch.io, and you can read a little bit about the mission here. I worked as the Lead Producer and Designer of this project over the last year, and am SUPER proud of it. This has been taking up a fair amount of my time lately, as I have learned more about the “post-production” process. It has been amazing experience seeing our game played by so many online, and being received so well in reviews. We just passed 14,000 units today, and taking part in this awesome team has been one of the most fullfilling experiences in my life. Here is a video of Tomato Gaming playing Liquidators in a livestream… One of my favorite playthroughs so far!
Aside from post-production work on Liquidators, I have also been working on a new full year project. I have been working as the Lead Engineer on The Trials of Snowshoe Thompson. The game emphasizes a unique movement mechanic, and realistic skiing physics, to take players through a narrative experience based around the famed mail delivery worker, John “Snowshoe” Thompson. This is by far the largest project I have ever taken part of, with over 20 team members, and we hope to be finished with Alpha sometime in January. The project has truly tested me as an Engineer, and I have loved every second of it. I lead a team of 5 other Engineers, and so far the most rewarding part of the game is working with such hard working individuals. Communication is something I think is most valuable in a game development environment, and being entirely remote has presented me with some unique challenges, but having a hard working and dedicated team has really made these issues non-existent.
So far, our Engineering team has conquered a lot of ground… I’m not sure how much I should really be showing of this, but ANYTHING for my website… (and I’ll keep it pretty concise for now). We have almost completed the movement system which is meant to simulate a realistic skiing experience. Furthermore, we have implemented a unique style of map meant to entirely replicate how a traditional map would be used to triangulate one’s position. The mechanic utilizes a compass, and a functionality which aligns the Map’s north with the World’s north. Obviously there is a lot more at work, but these are the most unique systems that we have (and the easiest to show off here). If I had to highlight any specific code chunk as my favorite from the project so far, I would have to say it is how we are handling the Player movement state. The Player is currently under the control of a finite state machine, which has 3 states: Moving, Not moving, and Map. But the movement state contains a sub-state enum which allows us to pretty seamlessly (and realistically) play with the player’s ability to move in certain scenarios. For example, a substate in the Movement State is “Right Stride Window”, which allows us to track (from within our Movement State tick) when the window for another stride opens up, and then expect/adjust behavior accordingly. And then based on this behavior, the Player Script (not to be confused with the state tick) will operate and adjust the active substate, which is then fed back into the Player Movement State Tick… Here’s a clip of some of our skiing movement!
Please Excuse Debugs!
And then a clip of the Map in action!
I’d like to emphasize that this has been a team effort for all of what we have accomplished, and I don’t in any way mean to take credit for this. These have been a product of the hard work of my team, and I’m just lucky to have people who care enough about a good product.
The final project that I’m currently working on is for a class, and the production takes place over about 6 weeks, but we plan to take this to a full vertical slice, by working through the month of December. So far, we are about 4 weeks in. The game currently has a working title of Wicker. The basis: You are being pursued. You must run through a storm of cubes to escape. The closer the pursuer gets to you, the faster the storm moves. Running through the storm slows you down. Left clicking clears a tunnel infront of you, right clicking places a light for you to see…. I’m not sure if that makes sense, but hopefully images and clips will help you understand!
I’m working on this project with the same team as made Boomer & Zoomer! I have been writing all of the code, and have really enjoyed my first venture into a “pursuer” style horror game. While we are still working on a lot of the horror aspects, we have finished a fairly comprehensive sound system which plays a pivotal role in one of our core mechanics. Essentially, players are following their ears, trying to reach an objective, while evading an ever pursuing AI. Here’s a clip of some gameplay we have:
Thanks for checking in guys! I really appreciate the continued support on my site! I’ll hopefully have something playable for you in the next post from both Snowshoe and Wicker.
Hello All! As with the last few posts up here, I hope every one of you is well and staying safe amidst Covid-19. To say we are witnessing history is an understatement. We are actively participating in history, as Covid has proven to be something which permeates all facets of life, for all. That said, I have continued to use my newfound free time to work on the same 2 projects I posted about last time. That post, of course, included the download link to the “Liquidators” demo, a year long project which is planning for a release on steam in the coming month, as well as a break down of a personal project I am still currently finishing up with a friend!
This project, which we have taken to calling “Boomer and Zoomer” (It wasn’t my idea)(I know, I’m sorry), has served as a great experience for me, as I have handled all Engineering. Everything from the audio manager to the shaders in the game, I have been the one responsible! And I have really enjoyed it! I post here today not to share code, but instead the most up to date build!
A little about the game:
It is a 2 player endless runner
It requires an Xbox (one or 360) controller
In its current state it has no tutorial (I will be working on this week)
Hello All, I hope everyone is at least as well as the last time I posted on here, hopefully even better. I wanted to write here today to update on my current projects. I am happy to announce that Liquidators, a yearlong project I have been lucky enough to be the lead producer of, has released a playable and open demo, for free. I would love to have support from my site and receive feedback on this game! It is a survival horror game based on the real life events which followed the reactor meltdown at Chernobyl. The demo can be downloaded HERE.
I will of course keep my site in the loop about this game, as we plan for a steam release this summer, hopefully. However, this is a site dedicated to my personal code and projects so I will carry on to stuff that you will definitely find less interesting than a nuclear reactor survival horror game which is literally free right up there ^. You could play it for FREE but you’re still reading this? Fine, if you’ve made it this far lets talk about scriptable objects and how I’ve been using them in my Finite State Machines in a separate, yet still cool, side project.
A little about this “side” project:
Been in production for almost 3 weeks
I’m working as the only engineer, Game being built in Unity, Being built for gamepad controllers (using primitive input system (I know))
it’s a 2 player endless runner
Player 1(Dog) can choose when to throw player 2(Boomerang)
Boomerang player aims themselves before throw
Dog player only has control of left and right movement, constantly moving forward
Boomerang player can control left, right, and forward back, still constantly moving forward, just at adjusted rate
Players try to survive as long as possible
Each have abilities they can use to help each other
“Tokens” used when using ability
Cylinder is enemy only boomeang can kill, kills dog. Wall blockades kill both
Here’s a clip:
Please excuse GIF quality
So here, you could imagine there are a few player states. Specifically, a state for each player when the boomerang is with the dog, for when the dog and boomerang are separate, and for when the boomerang dies and the dog persists. A Finite State Machine helps us out here because none of these states will be coexisting. So, each player will have their own instance of a StateMachine, which takes an iState, and they must communicate with one another, to ensure they are in proper states at all times, since one of their states being out of sync would inherently break the other’s state (since their controls are dependent upon one another).
If you have read my other posts here , or here, or here, or here or- okay you get it.. If you’ve seen those posts or the title of this one, you know that I love SODA. So given our state machine above, SODA fits into this very well. The first issue presented above is that our state machines must know the state of one another. SODA Events really help us with this here. When the dog throws the boomerang, it’s an event. The dog script doesn’t even communicate with the boomerang script directly. It simply invokes that event, and the GameEventListener on the Boomerang is quick to respond, switching to its “free” state, after a throwing thread, of course. This exists for all my state transitions here, except for the boomerang being caught by the Dog for that requires a synchronous tap of a button by both players. But you can see how that would ensure our State machine stay in our intended state.
The next BIG help from SODA in these FSMs is that my IntVariable type, the Scriptable Object int I’ve made, can be passed into my states, where they have free access to the value they need, and receive all live updates to that number via that reference. Confused? Imagine this: My dog player location is stored in my Vector3Variable Scriptable Object. In my state constructor, I take a type Vector3Variable _playerLocation. Now _playerLocation.value will be a reference to the exact spot in memory where my Player Location value is stored. Whether I just want to access it, or even adjust it, that value is live, and feeding into any other script that may need that live number. This is huge because normally I would have to make a reference to my player in every script that needs that number, and store it again in that script. Furthermore, by taking it in the state constructor, I don’t have to pester my player script to retrieve it every frame, because in the case of a value that is changed elsewhere, my state script will receive that update instantly through the magic of SODA!
I hope this makes sense, but in case it doesn’t, here’s some code:
//This is a state for player 1's movement, while the boomerang is in its backpack
//Here you have my declaration of the Variables I will need in this State
//Protecting these variables calmed down an empty value warning I was gettig
    protected Vector3Variable _dogLocation;

//Player speed can be changed at any time
    protected FloatVariable _playerSpeed;

//Player can move, or not
    protected BoolVariable _playerCanMove;

//Reference to Dog script
    protected DogPlayerMovement _player;

//Constructor
public ISDogRunning (Vector3Variable dogLocation, FloatVariable playerSpeed, BoolVariable playerCanMove, DogPlayerMovement player)
    {
//Simply taking the references I have, and setting equal to the Variable I need
        _dogLocation = dogLocation;
        _playerSpeed = playerSpeed;
        _playerCanMove = playerCanMove;
        _player = player;
    }

//.............................

//This is my state Tick, run every frame
public void OnStateTick ()
    {
        if (_playerCanMove.value)
        {
            //Moves player forwards
            _player.transform.Translate (Vector3.forward * Time.deltaTime * _playerSpeed);

            //Allows player to move LR
            _player.transform.Translate (Vector3.right * Time.deltaTime * Input.GetAxis ("P1Left Stick Horizontal") * horizontalMovementMod);

            //Throw boomerang when A pressed
            //Keyboard controls for debug
            if (Input.GetButtonDown ("P1A Button") || Input.GetKeyDown (KeyCode.E))
            {
                //Tells player to throw
                _player.BoomerangThrown (aimLocation);
            }

            //Reads for player using ability
            if (Input.GetButtonDown ("P1B Button") || Input.GetKeyDown (KeyCode.R))
            {
                _player.UseSelectedDogAbility ();
            }

            //Allows player to switch through abilities
            if (Input.GetButtonDown ("P1X Button") || Input.GetKeyDown (KeyCode.F))
            {
                _player.SwitchDogAbility ();
            }
        }

        //Gets player's aim
        //This state actually reads input from player 2 as well, as aiming component was initially part of dog
        //Axis is between -1 and 1, adding 1 and then dividing by 2 to get complete input
        aimLocation = Vector3.Lerp (_player.GetLeftAimLimit (), _player.GetRightAimLimit (), ((Input.GetAxis ("P2Left Stick Horizontal")) + 1) / 2);

        //Will rotate arrow assigned to plauer
        arrowGO.transform.LookAt (aimLocation);

        //Puts aim point at aim locations
        aimPointGO.transform.position = aimLocation;

        //Updates player's location
        _dogLocation.value = _player.transform.position;
    }
Hello all, this is an update to this project. That post contains a link to both the up to date engineering manifest of this project, as well as context to this post. But if you’re not here for the code talk then… it doesn’t matter I guess! I hope who ever may be reading this is having a great day and all is right in their world. Today I bring with me what will likely be the final build of Imponderabilia. The game has been extremely fun to work on, and really has taught me so much about architecture that I really look forward to applying to future projects.
Final build? But this is Version 0.7? Great observation! I wouldn’t feel comfortable dubbing this build as a completed version as we have not worked much (or at all) on the aesthetic of the game. So, as I’ve said in the previous build postings, I’m not an artist, this build is simply a proof of mechanics and architecture.
What has changed from previous build?Version 0.3 was largely an implementation of independent features which utilized the “InputGrouping” class I wrote and posted here.
Feedback
Emphasis on letting player know when an action has been completed
Indicators of when an interaction is available and how engage
Features
Implemented Rice Prep interaction
Implemented dependency between interactions
Player must cook rice first, then roll rice with fish, then cut roll.
Player can hold as many rice or uncut rolls as desired
Score system
Simple score system which considers the amount of sushi and quality/completion of required interactions
Added a timer which will end game after count down.
Bug Fixes
Key Sprite Manager (check engineering manifest in link at top of page)
Added FlipSprite method which fixed the irregularity in key sprite “pressing” animation
Sushi Roller
Countdown animation no longer misfiring when checking for input
Player Animator
Small bug fixes, added front and back walk animations
Here you go! Please enjoy, and direct any feed back you have to aidantakami@gmail.com
For those of you seeking a little more meat, below is my RiceMeter Game Object script. The product of this script can be seen when you approach the diamond colored grill in my build above. It consists of 2 sliders, and is meant to simulate the act of making rice.
By pressing space bar before the game start, the player adds rice to the pot which they will begin to cool once they “Interact”. The interaction begins once the player presses the indicated keys “AWDS” in that order. The player will now have begun the interaction. Players repeat that same motion of AWDS repeatedly to add water and clean the rice. however, once the water is full, the player can no longer add water, nor clean the rice. But players can drain the water by holding down space, which will allow room for more water to be added. But watch out, if you drain too much water, you will lose some rice. The 2 sliders represent the amount of rice, and the amount of water currently in the pot.
By adding rice, the player ends the interaction with more rice and can make more sushi from this rice, however the more rice added, the more tedious it is for the player to balance between adding water and draining it once the pot is full.
This script is only the half of the overall game, the other half is where all specific key strokes are registered, and where the outcome of the game is handled. However, this game object stores and deals with the values pertaining to how much rice and water are present, added, lost/drained, and all the above, making it (hopefully) a more enjoyable script to read. Here’s some code:
using System.Collections;
using System.Collections.Generic;
using UnityEngine;
using TMPro;
using UnityEngine.UI;

public class RiceMeterGO : MonoBehaviour
{
    //Sliders for the rice and water level
    public Slider riceLevel;
    public Slider waterLevel;

    //TMP used to indicate how much rice is in the pot
    public TextMeshProUGUI riceText;

   //float used to determine how much the rice must be washed
   // before the slider image, below, is lerped to green
    public float requiredWashes;

   //Slider image
    public Image waterFill;

   //How fast water is added and drained
    public float waterAddIncrement;
    public float waterDrainIncrement;

   //Used to progressively lerp slider image
    private float lerpInt = 0;
    private float timesWashed = 0;

    //Color32 used for lerping slider image
    private Color32 unwashedColor;
    private Color32 washedColor;

    //Enter key used to tell player when finished
    public SpriteRenderer enterKey;
    public SpriteRenderer enterKeyHighlighted;

    //float used to increment the key sprite switcher
    private float keySwitchIncrementer;

    public void Start()
    {
        //Set slider max and min
        riceLevel.minValue = 0;
        riceLevel.maxValue = 10;

        waterLevel.minValue = 0;
        waterLevel.maxValue = 10;

       //Instantiate colors
        unwashedColor = new Color32(255, 0, 38, 255);
        washedColor = new Color32(0, 255, 47, 150);

       //reset
        ResetMeter();
    }

    //Will add rice to the rice level slider.
    //Max rice that can be added is 5
    //Tis will be start of the game for UI
    public void AddRice()
    {
        //Adds rice if under or equal to 5 cups
        if(riceLevel.value <= 5)
        {
            //Increments
            riceLevel.value += 1;

            //If this is the first increment
            if(waterLevel.value == 0)
            {
                //set to 0.5 higher
                waterLevel.value = 1.5f;
            }
            else
            {
                //else just increase
                waterLevel.value += 1;
            }
        }
        //Else  increment
        else
        {
            riceLevel.value = 1;
            waterLevel.value = 1.5f;
            Debug.Log("Rice reset");
        }

        //Sets Rice Text UI to rice level
        riceText.text = riceLevel.value.ToString();
    }

    //Will return the number of rice in meter
    public float GetNumberOfRice()
    {
        return riceLevel.value;
    }

    //Will add water to the Water slider
    public void AddWater()
    {
        //If water level is okay add water
        if (!isWaterFull())
        {
            waterLevel.value += waterAddIncrement;
            lerpInt += waterAddIncrement;

            //Change color & value of water
            waterFill.color = Color32.Lerp(unwashedColor, washedColor, lerpInt * 0.04f);

            //increments times washeds
            timesWashed++;
        }
        else Debug.Log("Full");
    }

    public void DrainWater()
    {
        //If water level okey drain water
        if (isRiceLevelOkay())
        {
            waterLevel.value -= waterDrainIncrement;
        }
        else LoseRice();
    }

    //Used to check if water level is acceptable
    private bool isWaterFull()
    {
        //If water is higher than rice
        if (waterLevel.value == waterLevel.maxValue) return true;
        else return false;

    }

    private bool isRiceLevelOkay()
    {
        if (waterLevel.value > riceLevel.value) return true;
        else return false;
    }


    //Will return int representing the quality of the rice
    /*
     * Retrun 0: bad rice, no cookie
     * Retrun 1: okay rice... still no cookie for now
     * Retrun 2: good rice, cookie
     * Return 3: Master rice, cookies
     *
     */
    public int RiceQualityCheck()
    {
        if(timesWashed <= 49)
        {
            return 0;
        }
        else if(timesWashed <= 64)
        {
            return 1;
        }
        else if(timesWashed <= 79)
        {
            return 2;
        }
        else if(timesWashed > 80)
        {
            return 3;
        }
        else
        {
            return 0;
        }
    }

    private void Update()
    {
        //Will indicate to player when they have washed rice enough, triggers right before lerp is finished
        if(timesWashed > 80)
        {

            //Triggers enter key flashing
            if (keySwitchIncrementer < 1f)
            {
                enterKeyHighlighted.gameObject.SetActive(false);
                enterKey.gameObject.SetActive(true);
                enterKey.transform.position = new Vector2(gameObject.transform.position.x + 0.2f, gameObject.transform.position.y - 0.2f);
            }
            else if(keySwitchIncrementer < 2f)
            {
                enterKeyHighlighted.gameObject.SetActive(true);
                enterKey.gameObject.SetActive(false);
                enterKeyHighlighted.transform.position = new Vector2(gameObject.transform.position.x + 0.2f, gameObject.transform.position.y - 0.2f);
            }
            else
            {
                keySwitchIncrementer = 0;
            }

            keySwitchIncrementer += Time.deltaTime;
        }
    }


    public void LoseRice()
    {
        if(riceLevel.value >= 2)
        {
            riceLevel.value--;
            //Sets Rice Text UI to rice level
            riceText.text = riceLevel.value.ToString();
        }
        else
        {
            //Game End
        }
    }

    public void ResetRiceValue()
    {
        riceLevel.value = 1;
    }

    public void ResetWaterValue()
    {
        waterLevel.value = 1.5f;
    }

    public void ResetMeter()
    {
        ResetRiceValue();
        ResetWaterValue();

        lerpInt = 0;
        timesWashed = 0;
        waterFill.color = unwashedColor;
        enterKey.gameObject.SetActive(false);
        enterKeyHighlighted.gameObject.SetActive(false);
        riceText.text = "1";
    }

    //Used to set slider active or not
    public void SetRMActive(bool setActive)
    {
        waterLevel.gameObject.SetActive(setActive);
        riceLevel.gameObject.SetActive(setActive);
        riceText.gameObject.SetActive(setActive);

    }
}
Hello all, I just wanted to post an update to my post here about my current game project, as I do now have a build ready to share! Obviously, this is a super early build, but it will hopefully provide some meaning to the code I posted last week. But once again please keep in mind this project has only been in motion for a week, we have only used free or self made art assets, and exemplified here is only a proof of mechanics and basic architecture for those mechanics.
A good designer really shouldn’t provide tips to players before a play test, but since I’m not there to observe people play, I want to make a few notes about how this game is meant to be played, as it’s likely different from most games you have been exposed to!
You will play as a sushi chef, and be able to engage in the interactions that will eventually make up the foundation of the mechanics of this game! So be prepared to treat your keyboard as your work station as you go into this experience.
With your right hand, navigate usingarrow keys.
With your left hand, drag fingers along letter keys to engage “active interactions”.
Please don’t rush, treat your sushi gently.
Please report any bugs you find to me! aidantakami@gmail.com.
This is a VERY early build, there are bound to be lots of bugs and problems, but by play testing early, these bugs can be weeded out early, and save me the trouble later.
For my tech crowd, please take note that Input Manager at work there can be found in my last post, linked at the top of post. Additionally that post contains a link to my Engineering Manifest for the project, which contains summaries of all classes written for the project, as well ad general architecture overviews where necessary.
… and of course I would never leave you all without a script update. Today I’ll share with you guys a script which saved my life. After playing the build above, I’m sure you noticed the keys which animate alongside the player while they are close to an “active interaction”. Generally, one would either instantiate the specific key sprites when needed(both pressed and unpressed) or have each sprite referenced in code and pool them somewhere in the scene to use when needed, and be out of the view of player when not.
My KeySpriteManager sort of does both… but is useful for me as it can can take KeyCodes as args and return the corresponding “key sprite”. That’s right, public SpriteRenderer GetLetterSprite(KeyCode keyCode, bool keyPressed). Basically, my KeySpriteManager contains a List of SpriteRenderers of all the “key sprites” (which if you don’t get by now are the keys of a keyboard, individually cut out and used to emphasize the pressing of keys). Each letter contains both a pressed and unpressed sprite, so I allow access to the pressed sprites as well with the bool keyPressed.
Oh wow you made a list that takes KeyCodes and returns pictures who cares. I know. But this is incredibly useful for my game as InputGroupings (the class I shared in my last post (linked at top of post)) contain only keyCodes, and I can simply access these KeyCodes from any script and get the appropriate, matching key sprite from my KeySpriteManager. In addition to storing sprites, public SpriteRenderer FlipSprite(SpriteRenderer sr) will take a KeySprite, find it in the List, and based upon the spot it finds it in the List, return either the pressed or unpressed version of that key sprite, opposite of whatever was given to the function.
The code is quite repetitive, but I thought it would be good to share because of how greatly it works in conjunction with my InputGroupings class…. which I shared…. last week… link up top….. sorry. I’ll spare you guys the repetition of this code and trip it down, but you will certainly get the idea… Thanks for reading, here’s some code and a picture from the build I posted above!
using System.Collections.Generic;
using UnityEngine;

public class KeySpriteManager : MonoBehaviour
{
    //keySprites must have letter sprites entered in alphabetical order to function
    [SerializeField]
    public List<SpriteRenderer> keySprites = new List<SpriteRenderer>();


    //Will return corresponding SR for the KeyCode given
    //List is in aplhabetical order, A to Z, then 1 - 10
    //Array  must have list[x] = un pressed key, list[x+1] = pressed key
    public SpriteRenderer GetLetterSprite(KeyCode keyCode, bool keyPressed)
    {
        //This will be repetitive
        //Return Corresponding KeyCode
        if (keyCode == KeyCode.A)
        {
            //Returns unpressed key Sprite
            if (!keyPressed)
            {
                return keySprites[0];
            }

            //Returns pressed Key Sprite, sets ket to pressed
            return keySprites[1];

        }

        //Return Corresponding KeyCode
        else if (keyCode == KeyCode.B)
        {
            //Returns unpressed key Sprite
            if (!keyPressed)
            {
                return keySprites[2];
            }

            //Returns pressed Key Sprite, sets ket to pressed
            return keySprites[3];

        }

/*
 *
 *
 *      I told you I would spare you the repetition...
 *
 *
 */

        //Catch
        else return keySprites[0];

    }

    //Will returned the flipped sprite from the one provided
    public SpriteRenderer FlipSprite(SpriteRenderer sr)
    {
        //Finds sprite in List
        for(int rep = 0; rep < keySprites.Count; rep++)
        {
            //finds equivalent sprite
            if (keySprites[rep].sprite.Equals(sr.sprite))
            {

                if(rep % 2 == 0)
                {
                    return keySprites[rep + 1];
                }
                else
                {
                    return keySprites[rep - 1];
                }
            }
        }

        Debug.Log("Couldn't find sprite to flip.. probably the .Equals()");
        return keySprites[0];

    }
}
Hello all, I hope as you read this blog post all is well in your world, and that hopefully reading about some video game architecture might alleviate some of the stress in your life. I’ve talked about a few projects on this site before, but usually just the specific code or concepts that I contributed to the project. However, this is different. Throughout all of last week, a friend and I were ping ponging ideas off of one another until we came up with an expandable mechanic system, a design to foster that system, and an aesthetic that we hope to use to tell a compelling narrative.
Why is this project special? It’s not. It’s just a small game project with a buddy. This happens all the time. I know that. But it’s special in that I’ve written every script that goes into a simple game, which is significant because I’m starting from scratch and able to take who ever might be reading this, along with me.
The Game:
Mechanics built around affordances of the Keyboard.
Players will control 2D top down sushi chef with right hand
Players will engage in unique “active interactions” with left hand by dragging fingers along keyboard in specific patterns, as specified by each individual “active interaction”.
Example: Dragging your pointer, middle, and ring finger along the “QWE” keys and downwards (to “ASD” the to “ZXC”) to simulate the rolling of sushi.
Perfection of mechanics yields higher rewards to the player
Player will engage in various acts involved in being a sushi chef, from cutting rolls to purchasing fish, and live out a life controlled by the daily requirements and upkeep.
The Aesthetics Pitch: So far most energy has been aimed in the direction of building a system of solid mechanics and enjoyable gameplay, however this is what we DO have for aesthetic: You are a sushi chef, and run your own small shop where people often come and go. You live here, because you always work. However, after a disease sends your nation into quarantine, your daily life becomes controlled by a checklist of repetitious tasks.
NOTE: I’m not an artist, most of the assets being used in my game are from this pack. Very great assets. The Player animations and art are done by Shad.din. I’m actually working with Shad.din to get more animations for the player, and more that pertain specifically to this game.
Engineers Corner
This game is my child. I’ve written every piece of code in it, and I’m very very excited to share it with you. In fact, I’m so excited I’m actually going to make available my Engineering Manifest for this project, which will be live updated with all new content. HERE is the link! In this manifest you will find a comprehensive breakdown of all the architecture at work in the project. On my site, however, you will continue to receive deep dives into specific scripts and concepts, they will just likely all pertain to this game project for the time being.
Where and When Can I Play? I will post the first “early early” build on this site, soon… at the time of this post (check that link above, it’s definitely different now) I have constructed and implemented all the architecture necessary for the unique style of input which this game is built on. It has been implemented in 2 unique “active interactions”, with just very early UI and animations. The player controller and animator are finished. And then of course, SODA is completely implemented, making the entire project modular, adjustable, and “dependency free”…. okay maybe a few dependencies.
Where is the Beef? I get it, why come to this post if there’s no code talk. I respect that. Well, let me tell you about InputGrouping. InputGrouping() is a class I wrote for this project which allows us to detect input from specific, pre determined, groupings of keys. So think, how would you go about detecting when the player presses “Q”, then “A”, then “Z”? Did someone say new List<KeyCode>();? That person is wrong and stupid, you would use a new InputGrouping(); Because it does all the work of a List and more. So with that in mind, try to understand what’s going on here, and how I must be using it.
/*
 * An InputGrouping holds the keycodes necesary to execute a specific Advanced Interaction
 *
 * This will be used by our InputManager Script
 */

using System;
using UnityEngine;
using System.Collections.Generic;


public class InputGrouping
{
    //List of they keys sought by advanced mechanic, in order.
    public List<KeyCode> desiredInput = new List<KeyCode>();

    //InputGrouping will track it's own "progress" if keys are to be pressed in order
    public int currentStreakInt;

    public KeyCode GetNextKey(int placeInList)
    {
        //Should always be true
        if (desiredInput[placeInList] != null)
        {
            return desiredInput[placeInList];
        }

        //Debug section
        Debug.Log("Input Grouping value could not be found.");
        InputGroupingDebugger();
        return KeyCode.Backspace;

    }

    //Allows us to add keys to the list
    public void AddKey(KeyCode keytoBeAdded)
    {
        //Adds keycode to List
        desiredInput.Add(keytoBeAdded);
    }

    //Returns the size of the array, starting from 1
    public int GetSize()
    {
        return desiredInput.Count;
    }

    //returns progress through List
    public int CurrentStreak()
    {
        return currentStreakInt;
    }

    //Increases progress through List
    public void IncreaseCurrentStreak()
    {
        currentStreakInt++;
    }
    //Resets progress through List
    public void ResetCurrentStreak()
    {
        currentStreakInt = 0;
    }

    //Returns true if all keys in desiredInput are being pressed
    public bool AllKeysPressed()
    {
        //Int of how many keys are down
        int keysCorrect = 0;

        //Iteractes through keycodes
        for(int rep = 0; rep < desiredInput.Count; rep++)
        {
            //increments int if key is registered
            if (Input.GetKey(desiredInput[rep]))
            {
                keysCorrect++;
            }
        }

        //Returns true if int matches desiredInput count
        if(keysCorrect == desiredInput.Count)
        {
            return true;
        }
        else
        {
            return false;
        }
    }


   //call for multiple frame window and save highest return
   //Returns how many keys are pressed in List
    public int TotalNumberPressed()
    {
        //Int of how many keys are down
        int keysCorrect = 0;

        //Iteractes through keycodes
        for (int rep = 0; rep < desiredInput.Count; rep++)
        {
            //increments int if key is registered
            if (Input.GetKey(desiredInput[rep]))
            {
                keysCorrect++;
            }
        }

        return keysCorrect;
    }


    public void InputGroupingDebugger()
    {

        Debug.Log("InputGrouping Debug report:");
        for(int rep = 0; rep < desiredInput.Count; rep++)
        {
            Debug.Log("desiredInput[" + rep + "] = " + desiredInput[rep] + ". ");
        }

        Debug.Log("Report complete. Have a nice day!");
    }

}
It’s not too complicated, but given that my game is heavily dependent on specific keystroke patterns, InputGroupings have proven extremely successful in managing the mess that can come of dealing with complex input detection. And so for an example of how this script appears in my game, I’ll give some snippets below. to note in this code: desidredInput is the name of the List<KeyCode> contained in InputGrouping, as well as currentStreakInt is the internal int which iterates through the List.
            //InputGrouping qazKeys
            if (Input.GetKeyDown(qazKeys.desiredInput[qazKeys.currentStreakInt]))
            {

                //Sets current streak plus 1
                qazKeys.IncreaseCurrentStreak();

                //Resets internal clock, giving player more time to link interaction
                internalClock = Time.time;

                if (qazKeys.currentStreakInt == qazKeys.GetSize())
                {
                    //Begin Interaction
                    Debug.Log("QAZ Input Detected. MakiMaker in range? " + makiMakerInRange.ToString());
                    ResetAllStreaks();

                    if (makiMakerInRange)
                    {
                        //Raise Event
                        makiMaker.Invoke();
                    }

                }
            }
Of course you would have to see some SODA in my scripts. In case you’re unfamiliar with that makiMaker.Invoke() I highly urge you to check out some of my other posts about Scriptable Object Dependent Architecture. Well… that’s it for now. I hope that you enjoyed this post as much as I enjoyed sharing with you. And please check in for updates about the game, including playable builds! Wash your hands!
Image from Asset Pack we will be using, by GuttyKreum, linked above.
Hello all. Finals season is over, and I have the most persistent cold I’ve ever experienced… which means I have a lot of time. Luckily, I’ve been working on this project with my friends and had the opportunity to write some really cool code that I’d like to share here. The other engineer on the project, and myself have been trying to build the architecture of this game utilizing a very powerful tool: Scriptable Objects. If you don’t know what these are, I highly recommend watching this talk by Ryan Hipple. TL;DR You can utilize Scriptable Objects to store data, as opposed to individual method calls and dependencies within code, to keep the architecture modular, easily debuggable, and less prone to collapse on you. A Scriptable Object will store a variable and allow any function to access it, or modify it, so that all methods can just respond to this one value. Think “global variable” that exists in the editor.
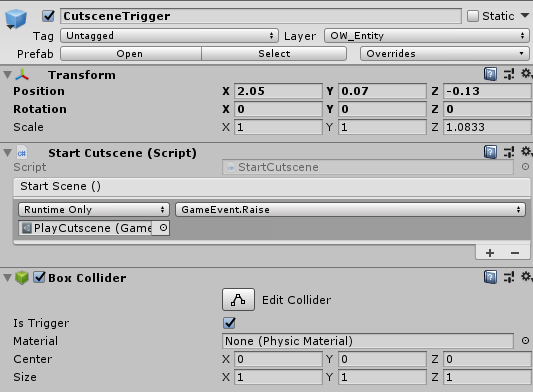
Another very cool principle in the talk by Ryan is using Scriptable Object Game Events (which take the same above principal, but utilize UnityEngine.Events;) to interface between everything in the scene that would otherwise be dependent through code. So here’s what I wrote: A cutscene manager for my game using Unity Timeline and Scriptable Object Game Events.
How it works: I have a UnityEvent StartScene that is Invoked OnTriggerEnter().
public class StartCutscene : MonoBehaviour
{

    //Event to start scene
    public  UnityEvent startScene;


    //on trigger enter
    private void OnTriggerEnter(Collider other)
    {
        //if player
        if(other.tag == "Player")
        {
            //raise
            startScene.Invoke();
            Debug.Log("Invoked");

        }
    }

}
Then this is what it looks like in editor. As a matter of fact, take my whole “CutsceneTrigger” prefab while you’re at it:
Note the UnityEvent is calling on the Game Event Scriptable Object “PlayCutscene” and Raising it. This signals to any Game Event Listeners (Once again, a Scriptable Object implementing the functionality of a Unity Game Event Listener) elsewhere in the scene that were set to listen to our Game Event Scriptable Object. In this case, I have 2 prefabs listening in on “PlayCutscene”. The first one is my CutsceneManager.
So take a nice long look at that beauty, and I think you might fully see what’s going on here. First off, I have the Game Event Listener which is making a call within my CutsceneManager Script to startNextCutscene(). startNextCutscene utilizes a Dictionary, which I have serialized at the top of the prefab. This dictionary takes the string name and the associated PlayableDirector, which is what controls Unity Timeline Playables. If you’re familiar with Dictionaries then you know they’re not serializable in Editor, but we can fix that with a nifty little work around in code.
//Serialized Dictionary Class
[System.Serializable]
public class Cutscenes
{
    public string cutsceneName;
    public PlayableDirector cutscene;

}


//Cutscene Manager will play the next applicable cutscene, storing all in a dictionary
public class CutsceneManager : MonoBehaviour
{

    //Note to design
    [TextArea]
    public string Notes = "Names should have no spaces or numbers and triggers should be place in order of encounter";

    //Array of Cutscenes, which contain our Dictionary compontents
    public Cutscenes[] toDictionary;

    //Dictionary that takes string name and PlayableDirector
    public Dictionary<string, PlayableDirector> listOfScenes;

    //Int to monitor which have played
    private int selection;

    //Unity Event to on trigger end of scene
    public UnityEvent endCutsceneEvent;


    //establishes Dictionary from serialized "Cutscenes"
    public void Awake()
    {

        //Instantiates Dictionary
        listOfScenes = new Dictionary<string, PlayableDirector>();

        //Fills that shit up
        for(int rep = 0; rep < (toDictionary.Length); rep++)
        {
            listOfScenes.Add(toDictionary[rep].cutsceneName, toDictionary[rep].cutscene);
        }


    }


    //Starts next cutscene
    public void startNextCutscene()
    {

        //Sets temp Playable Director
        Debug.Log("Signal Recieved");
        PlayableDirector temp = listOfScenes[toDictionary[selection].cutsceneName];


        //Starts cutscene
        Debug.Log("Starting...");
        temp.Play();

        //Event "stopped" is assigned to endCutscene, will call this function on raise
        temp.stopped += endCutscene;

        //Increments cutscenes
        selection++;


    }

    //Invokes UnityEvent to tell rest of scene
    private void endCutscene(PlayableDirector aDirector)
    {
        //Ends the cutscene
        endCutsceneEvent.Invoke();

        Debug.Log("Cutscene Ended");
    }

}
So I’ll try to break this down for those who can’t understand my comments, but basically at the very top we have the serialized class Cutscenes, which I’m taking all the components necesary for my dictionary. Then storing them in an array toDictionary. Then, on Awake() I’m taking those individual values from the array and storing them together in my Dictionary ListOfScenes. Also note that I have a UnityEvent here at the top.
So this is where startNextCutscene() comes into play. I take the next PlayableDirector in order and store it in my temp, but note how in the search through my Dictionary ListOfScenes I’m using the corresponding string stored in the Array toDictionary to index the needed PlayableDirector. Just thought that was sick. A little wonky… but cool.
Then temp is played, which cues the animation sequence of the PlayableDirector, otherwise known as the Playable. The PlayableDirector then sets off an event upon finishing which I’m listening to and invoking my own UnityEvent endCutsceneEvent.
This is where my CameraManager comes in. Note that in the above picture of my CutsceneManager Prefab, my Unity Event endCutsceneEvent is attached to another Scriptable Object Game Event “EndCutscene”
From the bottom up, the CameraManager is listening to 2 events, EndCutscene and PlayCutscene. Remember, these are our scriptable events, any listener in the scene has access to them! So these are both invoking responses within my CameraManager script. At the top you can see the manager takes 2 Cameras, as this script is responsible for switching between the cutscene camera, used in our PlayableDirector Playables, and the main camera, used for gameplay. Don’t worry, this is not the only script working on the camera right now, this is just helping us manage between the 2 specifically with Playables. Here’s that code:
[System.Serializable]

public class CameraManager : MonoBehaviour
{

    //Declares the cameras needed
    public Camera playerCam;
    public Camera cutsceneCam;

    public void Awake()
    {
        switchAfterCutscene();
    }


    //Starts the cutscene, swapping cameras
    public void cutsceneStart()
    {

        //Cameras swapped
        switchBeforeCutscene();

        //Debug
        Debug.Log("play cutscene");


    }

    //Ends the cutscene, swapping cameras
    public void cutsceneEnd()
    {
        //Cameras swapped back
        switchAfterCutscene();

        Debug.Log("Cutscene end");
    }


    //Swaps active cameras
    private void switchBeforeCutscene()
    {
        playerCam.enabled = false;
        cutsceneCam.enabled = true;

    }

    //Swaps active cameras
    private void switchAfterCutscene()
    {
        cutsceneCam.enabled = false;
        playerCam.enabled = true;
    }
}
Pretty self explanatory, but just note that the methods switchBeforeCutscene() and switchAfterCutscene() are both triggered by the corresponding Game Events in scene, in addition to the startNextCutscene() in the CutsceneManager. I wanted to show you to give an example of how using GameEvent Scriptable Objects allows multiple scripts to interface with one another without ever knowing the other exists!
You have to see how this is such a god send for devs who want to keep dependencies low and the engine easy to use for designers. Here, a designer who has been briefed can easily establish a whole system of cutscenes in their level without ever having to see a single class.
Happy holidays to everyone! I’ll be back soon with more.